Those who followed up with us on NVIDIA GAME24 event , already know that new beast, NVIDIA Maxwell GM204 GPU is well capable of capturing some serious scores with extreme overclocking and liquid nitrogen cooling help.
We used EVGA GeForce GTX 980 reference cards together with EVGA EPOWER VRM module to reach out fearsome 2067 MHz clocks stable and clean over 3Dmark benchmarks .
No doubt, modifying your GTX 970/980 to for these kind of results is not a five minute job and require some above-minimal soldering skill knowledge. Those heavy overclockers who are into this already got their EPOWERs, copper clads, soldering tools and Maxwell cards on operation table, but today here we talk about more broad range of pips, who just wanna max out Maxwell with simple trimpot modifications to bump voltages for everyday overclocking on air/water or even mild extreme cooling. We will also talk a little about removing power limits and overheat thermal protection
Be very well aware, that even little simple mod, basically anything below this paragraph in this article is NOT covered by any kind of warranty, and provided AS IS, without any support from manufacturer or NVIDIA. You are on your own here, folks, so "don't try this at home".
Okay, enough talk, let's blow it up!
STEP 1
We will need basically next to get our successful modding of reference GTX 980 card.
Modification of GTX 970 follows same idea, but since layout is different, at this moment you will have
to find exact way by yourself. I'll focus on GTX 980 first.
* Card itself. We got two EVGA GEFORCE GTX 980 (04G-P4-2978-KR) cards to play with.
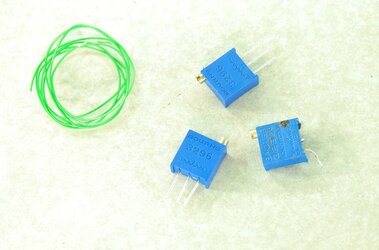
* 3 x 50 ohm multiturn VRs (trim pots).
* 25-45W soldering iron for trimpot mods.
* Roll of 28-32AWG insulated wire
* Soldering FLUX
* Kingpincooling TEK9 FAT (don't forget who's forum is here, yes we use only KPC cooling for our LN2)
* DMM (I use my trusty Fluke 87V and Keithley 2002, but any DMM can fit this needs)
* Low-ESR capacitors (2.5 or 4V rated, 680-820uF , etc) if you like, but not required.
Since we don't cover EPOWER connection to card this time, we don't need to use high-power soldering iron,
so pretty much any soldering gear you have on table will fit the task.
I got an upgrade for my personal gear setup, so from now soldering with ERSA iCON-1 soldering station with 120W capable soldering. I used 102CDLF2.4 tip for this guide, temperature set to 290C.
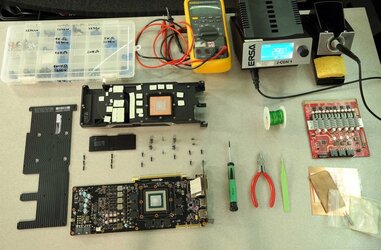
Clean your mess on table, get all tools checked and ready, turn on enough lights to clearly see tiny parts on PCB. Your setup should look like next:

STEP 2
Remove cooler from the card, since we need access to front of PCB.
This time NVIDIA did not use TORX, so usual philips will do just fine. Better keep all those custom screws
in secure place together, so you can put heatsink back after you done if you will decide to do so.
Remember, after soldering your warranty will be surely violated, as every RMA center will easily see non-factory soldering specks, even if you very careful

Our table now looks like this:

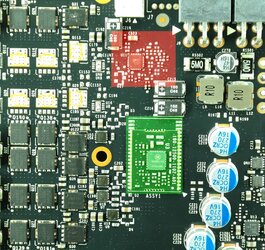
Primary areas to see are: Green - GPU voltage controller, Red - memory voltage controller area:

STEP 3
Prepare VR's. Find 50 ohm nominal resistance multiturn variable resistors (potentiometers). I use very common blue square 3296 type.


We used EVGA GeForce GTX 980 reference cards together with EVGA EPOWER VRM module to reach out fearsome 2067 MHz clocks stable and clean over 3Dmark benchmarks .
No doubt, modifying your GTX 970/980 to for these kind of results is not a five minute job and require some above-minimal soldering skill knowledge. Those heavy overclockers who are into this already got their EPOWERs, copper clads, soldering tools and Maxwell cards on operation table, but today here we talk about more broad range of pips, who just wanna max out Maxwell with simple trimpot modifications to bump voltages for everyday overclocking on air/water or even mild extreme cooling. We will also talk a little about removing power limits and overheat thermal protection
Be very well aware, that even little simple mod, basically anything below this paragraph in this article is NOT covered by any kind of warranty, and provided AS IS, without any support from manufacturer or NVIDIA. You are on your own here, folks, so "don't try this at home".
Okay, enough talk, let's blow it up!
STEP 1
We will need basically next to get our successful modding of reference GTX 980 card.
Modification of GTX 970 follows same idea, but since layout is different, at this moment you will have
to find exact way by yourself. I'll focus on GTX 980 first.
* Card itself. We got two EVGA GEFORCE GTX 980 (04G-P4-2978-KR) cards to play with.
* 3 x 50 ohm multiturn VRs (trim pots).
* 25-45W soldering iron for trimpot mods.
* Roll of 28-32AWG insulated wire
* Soldering FLUX
* Kingpincooling TEK9 FAT (don't forget who's forum is here, yes we use only KPC cooling for our LN2)
* DMM (I use my trusty Fluke 87V and Keithley 2002, but any DMM can fit this needs)
* Low-ESR capacitors (2.5 or 4V rated, 680-820uF , etc) if you like, but not required.
Since we don't cover EPOWER connection to card this time, we don't need to use high-power soldering iron,
so pretty much any soldering gear you have on table will fit the task.
I got an upgrade for my personal gear setup, so from now soldering with ERSA iCON-1 soldering station with 120W capable soldering. I used 102CDLF2.4 tip for this guide, temperature set to 290C.
Clean your mess on table, get all tools checked and ready, turn on enough lights to clearly see tiny parts on PCB. Your setup should look like next:
STEP 2
Remove cooler from the card, since we need access to front of PCB.
This time NVIDIA did not use TORX, so usual philips will do just fine. Better keep all those custom screws
in secure place together, so you can put heatsink back after you done if you will decide to do so.
Remember, after soldering your warranty will be surely violated, as every RMA center will easily see non-factory soldering specks, even if you very careful
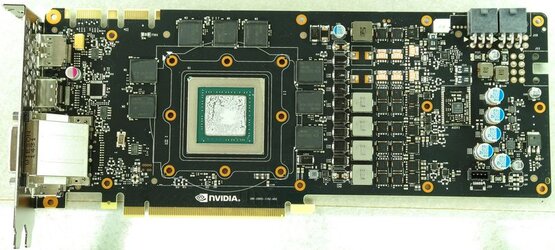
Our table now looks like this:
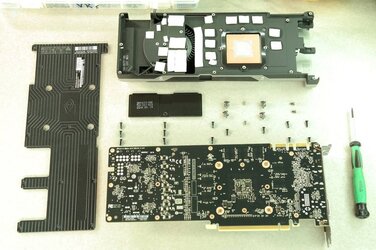
Primary areas to see are: Green - GPU voltage controller, Red - memory voltage controller area:
STEP 3
Prepare VR's. Find 50 ohm nominal resistance multiturn variable resistors (potentiometers). I use very common blue square 3296 type.
