- Joined
- Aug 11, 2008
...Return to article to continue reading.This article will serve as a reference for those who would like to compare results with our reviews, whether you are writing an article for the site or just testing the performance of your new GPU. The plan is to keep this article updated as changes in our testing procedures occur. On to the gritty details…
For some unknown reason, it seems the original comment thread to the above frontpage article is MIA. So, this is the new comments thread for GPU testing procedures.
Old Procedures as of 11/12/2013
Alien vs Predator
Run the benchmark tool
Run the in-game benchmark
Play the first mission of the single player campaign
Run the benchmark through the combination of a shortcut and parameters
Run the in-game benchmark, not the benchmark launcher in the install directory. The launcher cannot easily max all of the settings.
Run benchmark tool located in the install directory
Run the benchmark tool
- Resolution: 1920×1080
- Texture Quality: Very High
- Shadow Quality: High
- DX11 Features – Hardware Tessellation & Advanced Shadow Sampling
- Anti-Aliasing: 4x MSAA
- Antistropic Filtering: 16x AF
- SSAO: On
Run the in-game benchmark
- Resolution: 1920×1080
- VSync: Off
- Anti-Aliasing: 8x MSAA
- MVSS and HBAO
- Tessellation: High
- Detail Level: Extreme
- Other Settings: Yes
- PhysX: Off
Play the first mission of the single player campaign
- Resolution: 1920×1080
- Settings: “Ultra” Preset
- Open FRAPS, and be sure Min/Max/Avg is selected
- Start the first mission: Operation Semper Fidelis
- After you pick up the pistol and are looking forward, begin the FRAPS recording by pressing F11
- Work through the level as normal
- Stop the recording by pressing F11 when you’re at the end of the level and the enemy puts his hands up
- The results will be placed in a .csv file located in the “C:/FRAPS/Benchmarks” directory
- Record the average FPS
Run the benchmark through the combination of a shortcut and parameters
- Go in-game (DX11) to set graphics settings as follows:
- 1920×1080
- 8x MSAA
- VSync Off
- High Detail Strategic View: Enabled
- Other Settings: High
- Find the config file in the “C:/Users/<insert username>/Documents/Sid Meier’s Civilization 5″ directory and set “LoggingEnabled = 1″.
- Create a shortcut on the desktop pointing to “CivilizationV_DX11.exe”.
- Right click on the shortcut and go to Properties.
- On the Shortcut tab, add “-benchmark LateGameView” to the end of the Target field.
- Click the shortcut to run Bench. It takes 3 minutes and 50 seconds to run.
- Open the LateGameViewBench.txt log file within the ”C:/Users/<insert username>/Documents/Sid Meier’s Civilization 5/Logs″ directory. There are three different scores in the log file: full render, no shadow render, and no render. The scores are the number of frames rendered in 60 seconds. The full render score is what we want to use to get FPS, and to get FPS divide the full render score by 60.
- Record the result.
Run the in-game benchmark, not the benchmark launcher in the install directory. The launcher cannot easily max all of the settings.
- Resolution: 1920×1080
- Anti-Aliasing: 8x MSAA
- In-game Settings: Everything enabled and maxed (High or Ultra depending on setting)
- NOTE: The DiRT3 bench results can vary a lot. For example, if your car happens to get into 1st place quickly, the FPS results will be high because there were no other cars on the screen to render during the race. So, if your results seem high, then that might be the cause.
Run benchmark tool located in the install directory
- Resolution: 1920×1080
- DirectX version: DX11
- Quality: Very High
- Anti-Aliasing: 4x MSAA
- Texture Filtering: 16x AF
- PhysX: Off
- Depth of Field (DOF): On
- Scene: Frontline
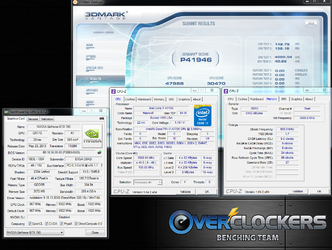
3DMark Vantage
DirectX 10 benchmark running at 1280x1024

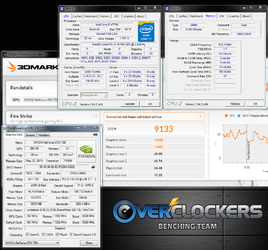
3DMark - Fire Strike
DirectX 11 benchmark running 1920x1080

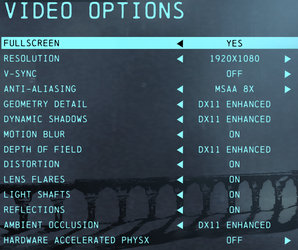
Batman: Arkham Origins
1. Adjust the graphical settings in-game to match the following:

2. Create a shortcut to the game
3. Right click the shortcut and go to Properties
4. Add "benchmark" to the end of the Target line so it looks like this: "C:\Program Files (x86)\Steam\SteamApps\common\Batman Arkham Origins\SinglePlayer\Binaries\Win32\BatmanOrigins.exe" benchmark
5. Now, clicking the shortcut will run the benchmark
6. Record the FPS shown when the test is finished
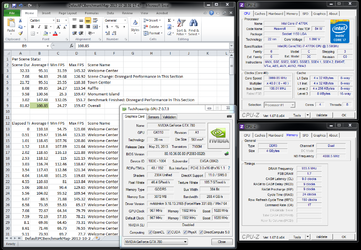
Bioshock Infinite
1. Create a shortcut to the Benchmark.bat file in the install directory
2. Right click on the shortcut and go to Properties
3. Add "UltraDX11_DDOF -resx=1920 -resy=1080 -unattended" to the end of the Target line so that it looks like this: "C:\Program Files (x86)\Steam\SteamApps\common\BioShock Infinite\Binaries\Win32\Benchmark.bat" UltraDX11_DDOF -resx=1920 -resy=1080 -unattended
4. Now when clicking the shortcut it will run the benchmark with the desired settings
5. When the test is done, you should get a popup asking if you want to open the results file, which is located in the "C:\Users\<username>\Documents\My Games\BioShock Infinite\Benchmarks" directory. When opened, it should look like below and I highlighted the desired FPS number in green

GRID 2
1. Go to GRID Online
2. Go to Options > Extras > Options > Graphics Options > Video Mode to adjust some basic settings, then go to Quality - Advanced to adjust the rest of the settings. They should match the settings below:


At the bottom of the Options > Extras > Options > Graphics Options screen, there should be an option called Graphics Benchmark to start the test
DirectX 10 benchmark running at 1280x1024
- Performance preset
- Feature tests can be disabled since they don't affect the score
3DMark - Fire Strike
DirectX 11 benchmark running 1920x1080
- Standard Fire Strike test (not Extreme)
- "Include Demo" can be unchecked since it doesn't affect the score
Batman: Arkham Origins
1. Adjust the graphical settings in-game to match the following:
2. Create a shortcut to the game
3. Right click the shortcut and go to Properties
4. Add "benchmark" to the end of the Target line so it looks like this: "C:\Program Files (x86)\Steam\SteamApps\common\Batman Arkham Origins\SinglePlayer\Binaries\Win32\BatmanOrigins.exe" benchmark
5. Now, clicking the shortcut will run the benchmark
6. Record the FPS shown when the test is finished
Bioshock Infinite
1. Create a shortcut to the Benchmark.bat file in the install directory
2. Right click on the shortcut and go to Properties
3. Add "UltraDX11_DDOF -resx=1920 -resy=1080 -unattended" to the end of the Target line so that it looks like this: "C:\Program Files (x86)\Steam\SteamApps\common\BioShock Infinite\Binaries\Win32\Benchmark.bat" UltraDX11_DDOF -resx=1920 -resy=1080 -unattended
4. Now when clicking the shortcut it will run the benchmark with the desired settings
5. When the test is done, you should get a popup asking if you want to open the results file, which is located in the "C:\Users\<username>\Documents\My Games\BioShock Infinite\Benchmarks" directory. When opened, it should look like below and I highlighted the desired FPS number in green
GRID 2
1. Go to GRID Online
2. Go to Options > Extras > Options > Graphics Options > Video Mode to adjust some basic settings, then go to Quality - Advanced to adjust the rest of the settings. They should match the settings below:
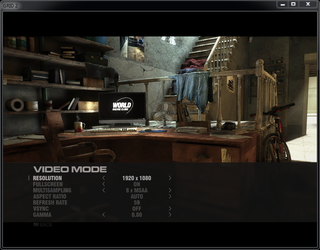
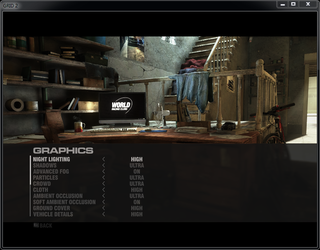
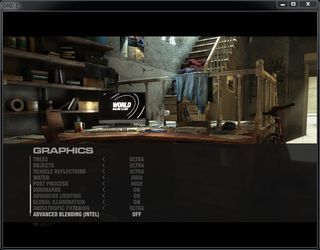
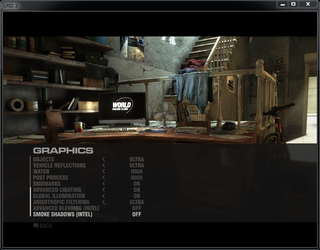
At the bottom of the Options > Extras > Options > Graphics Options screen, there should be an option called Graphics Benchmark to start the test
Last edited by a moderator:
