- Joined
- Mar 28, 2003
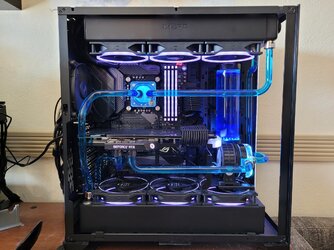
After assembling my first custom loop and already having done one full service on the loop, I have identified a few opportunities to improve the maintenance of it, and I am hoping to make some changes later this year.
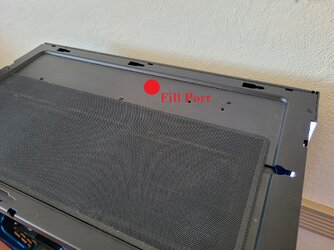
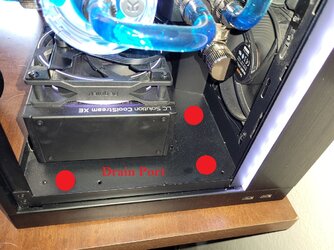
I'm wondering if anyone here might have some pictures of their panel mounted fill/drain ports on their cases. I'm planning to rearrange my loop components on my next service interval, moving my XSPC RX360 radiator from the top of my case to the bottom, and utilizing one of the ports on the end as a drain, plumbing it to either the rear panel or the floor of the case, for quicker and more effective draining solution. Since I plan to rearrange the components and redo some of the tube runs, I figure I might as well add a fill port to the top of the case, under the top panel, plumbing it directly to the cap of the reservoir.
I have a lot of fittings on the way to aid with this plan, and I have until June for my next service interval, so this is just the planning stage at the moment. Hopefully I can get away with using some rotary fittings to aid with full disassembly when I need to tear it down for cleaning, but I'm looking for a clean solution to the drain/fill process to help make it less awkward and time consuming.
I have attached some pictures of the current setup I have and where I am considering drain and fill port locations. I do have a reservoir pump mount, and I am playing around with the idea of removing the inertia pump head and just combining the pump and reservoir, depending on how clean I can run the tubes with that arrangement.
Edit: Yes, the pump to GPU tube is inclined slightly. I didn't notice it until I took the pictures and really looked at them. Looks like I didn't cut the tube enough at the GPU inlet when I upgraded.