-
Welcome to Overclockers Forums! Join us to reply in threads, receive reduced ads, and to customize your site experience!
You are using an out of date browser. It may not display this or other websites correctly.
You should upgrade or use an alternative browser.
You should upgrade or use an alternative browser.
AMD Phenom II X4 955 Overclocking Help - I am a noob!
- Thread starter Shadedluck
- Start date
- Joined
- Apr 20, 2004
- Location
- JAX, Mississauna
REmove the fan. U got to give to get. The only side fan I ever ran, ran me in a circle until I realized temps dropped when that side fan need to blow out and not in. Like to have run me ragged until I just plain ditched the blow in idea and reversed the fan. So everything does not work exactly as I expected it to do.
- Joined
- Dec 27, 2008
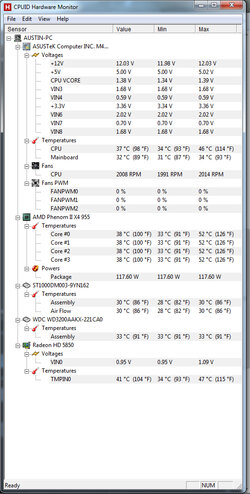
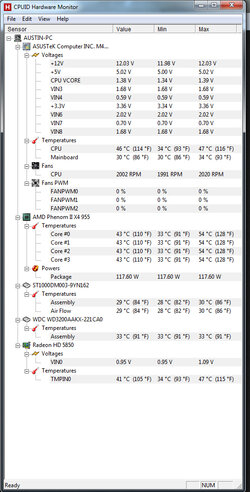
Looks like it runs a couple of degrees cooler with the case open. I would take some cardboard and tape and cover up the hole where the side panel fan was so that the rear fan draws air from the front of the case. Having a hole in he side panel after removing the fan disrupts the strength of the air flow from front to back. You might also consider putting a stronger fan in the rear panel.
The other thing I would definitely do is remove your CPU cooler and redo the thermal paste. Of course, this assumes you have some extra thermal paste around. If not, go get a small tube of Arctic Silver 5 or Coolermaster MX2 or MX4. Don't apply the paste like the cooler manufacturer says to do it. There is a better way with those exposed heat pipe coolers. First, get two or three paper coffee filters and some isopropyl alcohol. Wipe off the old paste from the CPU face and the bottom of the heatsink. Get the bulk of it off with dry coffee filters and then finish the job with one moistened with a little alcohol. Coffee filters are great for this because they have a hard sheen and don't leave insulating fibers behind.
Then apply the paste. Don't use the "pea-sized blob in he middle" method. That sometimes doesn't work well with the exposed heat pipe coolers. The ridges between the pipes sometimes keep the paste from spreading. Do this instead:
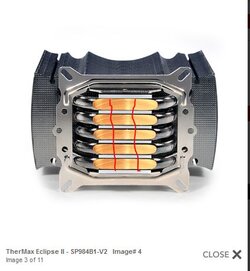
First, squeeze a tiny line of thermal paste along the sides of the copper heat pipes at the cooler base. Take a putty knife, razor blade or plastic credit card and swipe across the cooler base back and forth with downward pressure to force some thermal paste into the groves along side the pipes at the cooler base. This is called "tinning". Then apply two thin lines of paste across the base so as to divide the area into approximately equal parts (see attached pic). Don't try to spread the paste with anything. Next, just lower the cooler onto the CPU and clamp it down, using a back and forth "X" pattern as you tighten the screws a little bit at a time. Allow the clamping pressure to spread the paste. Make sure the clamping screws are fully tightened. Good pressure between the heat sink base and the CPU face is essential.
The other thing I would definitely do is remove your CPU cooler and redo the thermal paste. Of course, this assumes you have some extra thermal paste around. If not, go get a small tube of Arctic Silver 5 or Coolermaster MX2 or MX4. Don't apply the paste like the cooler manufacturer says to do it. There is a better way with those exposed heat pipe coolers. First, get two or three paper coffee filters and some isopropyl alcohol. Wipe off the old paste from the CPU face and the bottom of the heatsink. Get the bulk of it off with dry coffee filters and then finish the job with one moistened with a little alcohol. Coffee filters are great for this because they have a hard sheen and don't leave insulating fibers behind.
Then apply the paste. Don't use the "pea-sized blob in he middle" method. That sometimes doesn't work well with the exposed heat pipe coolers. The ridges between the pipes sometimes keep the paste from spreading. Do this instead:
First, squeeze a tiny line of thermal paste along the sides of the copper heat pipes at the cooler base. Take a putty knife, razor blade or plastic credit card and swipe across the cooler base back and forth with downward pressure to force some thermal paste into the groves along side the pipes at the cooler base. This is called "tinning". Then apply two thin lines of paste across the base so as to divide the area into approximately equal parts (see attached pic). Don't try to spread the paste with anything. Next, just lower the cooler onto the CPU and clamp it down, using a back and forth "X" pattern as you tighten the screws a little bit at a time. Allow the clamping pressure to spread the paste. Make sure the clamping screws are fully tightened. Good pressure between the heat sink base and the CPU face is essential.
Attachments
- Joined
- Apr 20, 2004
- Location
- JAX, Mississauna
holes for the heatsink fasteners are stripped, so I am getting a new case.
Heatsink mounting holes are stripped so you are going to get another case!!! That does not compute. I don't know of any CPU Cooler that mounts to any part of the case. How is a new case going to fix stripped cpu cooler mounts? Must be something new I never have seen anywhere.

- Joined
- Aug 16, 2009
I reapplied the paste and learn some unfortunate news: the holes for the heatsink fasteners are stripped, so I am getting a new case. Any suggestions?
That could explain some of the higher temps he has been experiencing as he probably wasnt getting good contact.
- Joined
- Dec 27, 2008
The Coolermaster Hyper 212+ Evo that you have is a bolt through type mount. The stock plastic heat sink clip-style bracket that the stock AMD cooler uses is removed. On the under side of the motherboard goes a steel "back plate" that serves as the anchor for the mounting screws that fasten the heat sink to the motherboard. I think there are four nuts that go on the underside of the back plate that the screws mate with. My guess is that when you removed the screws the nuts may have fallen off and are laying under the motherboard.
When you install the Coolermaster Hyper 212+ evo cooler you must do it with the motherboard out of the case so you can access those four nuts underneath the steel back plate. Also realize the four screws first screw into the chrome retention bracket that is fastened to the cooler. Check their tightness. They have left hand threads, meaning they tighten the opposite direction from what you are used to.
The easiest way to install this cooler is, and this takes two people:
1. Make sure the screws are tightened in the four legs of the retention bracket which is attached to the base of the cooler itself. Left hand threads.
2. Remove the motherboard.
3. Set the Hyper 212+ evo cooler upside down on a counter top making sure the backside of the cooler will be facing the back edge of the motherboard. Apply the thermal paste as I instructed earlier on the cooler base.
4. Carefully lower the motherboard onto the upside down cooler, guiding the four screws through the holes in the motherboard. Make sure you turn the motherboard so that the back edge is lined up with the back side of the cooler. You don't want to get the whole thing bolted down and then realize you got it on backward.
5. Have your helper hold the motherboard level on the base of the cooler while you . . .
6. Lay the steel back plate on the motherboard so that the four screws poke up through the four holes in the bac kplate. Make sure the plastic liner side of the steel back plate is toward the motherboard. This is the insulator.
7. Start the four retaining nuts onto the for screw tips with your fingers and then tighten each of them firmly with an appropriate sized nut driver or socket. Tighten each one a little at a time going back and forth in an "X" pattern to make sure the pressure is distributed evenly.
I think this is how the mounting mechanism works with the Hyper 212+ evo. I think it's the same as it is on my Hyper N 520 and on many other Cooler Master CPU coolers.
Last edited:
OP
- Joined
- Sep 14, 2012
- Thread Starter
- #32
So you guys may have seen how stupid I am. I apologize for that. After I opened the case up, both sides, I discovered what I originally had thought to be stripping, was that the nuts on the back of the mount had fallen off. I put them back on. I'm sorry I made you guys rack your brains so hard for this. Afterwards when I was about to turn the computer back on, I discovered my power strip is broken. So I have a new power strip, applied the paste like you said, the heatsink is firmly in place, and I'm ready to attempt another test. Sorry! XD
- Joined
- Apr 20, 2004
- Location
- JAX, Mississauna
I am not going to tell about the little ordeal I just went thru trying to quick test a mobo for my Father, using a cpu I found in a trash dump. Looked like something was on fire with me running around finding and then finding the 'next' thing I needed since I did not want to strip down my test bench.
I found the power supply that I forgot was bad. Sure to find it first. Hehehe. But installing Win 7 with a 300Mhz overclock and who in the world knows what speed the ram is running. If it does all this (nearly thru) I can pronounce it a good from the garbage can CPU. Hehehe. But what a trip to find and get in order to run this test of cpu. Monkey and a football look-a-like to me.
RGone....ster.
- Joined
- Dec 27, 2008
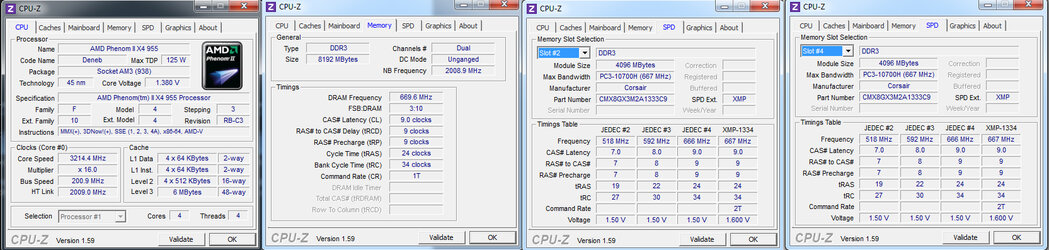
Now, before I go to bed, please post new pics of CPU-z tabs: CPU, Memory and SPD. Are Cool N Quiet and C1E disabled in bios. Do you have the Windows Control Panel Power Options set to High Performance?
Also, please create a "Sig" with your system info so anyone helping you has ready reference to what you are working with. To create a Sig, go to top of the page and click on Quick Links and then click on Edit Signature. Use mine for an example of what we like to see included if you wish. Please include info about your case and ventilation. The Sig is a common courtesy on the forum to give those helping you ready reference to what you are working with, especially as the strings get long and early posted info gets buried.
Also, please create a "Sig" with your system info so anyone helping you has ready reference to what you are working with. To create a Sig, go to top of the page and click on Quick Links and then click on Edit Signature. Use mine for an example of what we like to see included if you wish. Please include info about your case and ventilation. The Sig is a common courtesy on the forum to give those helping you ready reference to what you are working with, especially as the strings get long and early posted info gets buried.
Last edited:
- Joined
- Dec 27, 2008
Sorry, but when you lump those images together on one pic like that they become so small I cannot read the values in CPU-z. Please try that again. This time, use Snipping Tool in Windows Accessories to crop and save each tab as an individual image and upload each one separately. I'm working from a laptop right now.
- Joined
- Dec 27, 2008
You can right click view image, it'll make it bigger. The forums scale it down some, it seems.
I thought I tried that earlier today and it didn't seem to work. Does now, however.
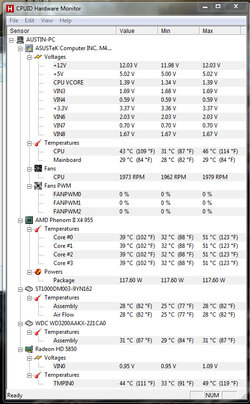
So what you want to try now is increasing your CPU multiplier by .5x increments until you cannot pass a 20 minute Prime95 run, meaning you get blue screen, lockup, spontaneous restart or one of the Prime95 core workers drops out. Withe each such stress test, make sure you have HWMonitor open on the desktop to monitor core and CPU socket temps. You don't want core temps to exceed 60c or CPU socket temps to exceed 70c. Stop the test if either happens. Soon as you fail, post back with pics of HWMonitor and the the CPU tab of CPU-z. Then we'll look at increasing the CPU voltage if the temps look okay.
Bed time for me.
Similar threads
- Replies
- 33
- Views
- 2K
- Replies
- 4
- Views
- 117
- Replies
- 2
- Views
- 2K