- Joined
- Feb 4, 2002
- Location
- Corvallis, OR
Cool and Quiet Over-clocking made easy for AMD64 and nForce 4
AND IT WORKS!!!
Wouldn’t it be nice to have your comp running at 28C and extremely stable at 1.8GHZ while writing that critical paper and then automatically without ANY effort turn into a screaming and stable beast at 2.75 GHZ in battlefield 2!? This is all possible and with MOST AMD64 / nforce4 systems. And these numbers above are effortless with an X2-4400+ and ALL SLOTS filled with ram.
This guide will first take you through the bios and then through the tools (RM clock and systool) to accomplish this task relatively painlessly. This guide is a lot of words, but you will find there isn’t much you will have to do. Please read the entire guide before starting.
The test system: DFI nForce 4 SLI-DR, AMD Athlon™ 64 X2 Dual Core 4400+, 4 sticks of 512GB OCZ VX PC4000 at 3.3V
The Bios: This is a critical component and most enthusiast nForce 4 boards will have all the settings you need to make this work and work well. In this case, a semi modified bios for the DFI nForce 4 boards was chosen. The chosen bios, called 623-2bta, was originally “cleaned up” by Oskar Wu and then OCZ Tony and it was chosen because unlike the next bios iteration 704-2bta, the 623-2bta bios still INCLUDED the ‘CPU VID Special Control’ setting 123% (we’ll get to that in a moment). Suffice it so say that in order for me to truly have access to “over-clocking” voltages with cool and quiet enabled, I needed this option. There is talk out there that this setting can be dangerous…but it’s only true if you don’t do your homework and you don’t follow instructions. It can be dangerous because it automatically increases your base voltage to 123% of what it is set at whether set as ‘CPU VID startup Voltage’ or ‘CPU VID control’ which kicks in after startup. Also, you may not really need to adjust the 'CPU Vid control' to anything over 113% to get a strong overclock. In the case of the AMD X2 4400+, the “auto” settings for startup and VID control are approximately 1.3 V. With the 123% setting enabled, the voltage is set (AT ALL TIMES) to 123% of the ‘auto’ setting and thus 1.6V. This is a little high and CAN be catastrophic, especially if YOUR board produces 1.33V at its auto voltage setting. **At this time…I will insert disclaimer (I take no responsibility whatsoever for your computer and what you do with or to it)**. However if you follow this guide your CPU will not be subject to catastrophic voltages and if you are worried start out at 113%. Before we get to settings… let’s get our bios, our two tools and the latest AMD64 driver. The AMD driver is not essential to get this working but it’s advisable to have it anyway as it’s optimized to interact with XP.
The process: Download the bios, two tools, and the latest AMD driver for your processor.
A great Bios source for the DFI nForce 4 boards is here…
http://www.lejabeach.com/DFI/dfinf4ultra/dfinf4bios.html
Systool (authored by W1zzard and provided by tech powerup.com) is available here…
This is a very powerful tool, but any FSB adjusting tool that works will suffice.
http://www.techpowerup.com/systool/
The RM Clock utility ver. 1.8 (by cpu. Rightmark) is available here…
http://cpu.rightmark.org/download.shtml
The latest AMD64 processor drivers are available by clicking on the appropriate AMD64 processor type here…
http://www.amd.com/us-en/Processors/TechnicalResources/0,,30_182_871,00.html
Installation and configuration
First, check your bios… if you already have the ‘CPU VID Special Control’ setting 123% then you need not re-flash your bios. If you don’t have this setting in your bios then boot your system with STOCK speeds and find a bios that does have the 123% setting or an equivalent…. (i.e. 623-2bta in the case of the DFI nForce boards). Flash your board with the ‘new’ bios using winflash (load the bios file, check all the boxes in winflash and let her rip) or the flashing method of your choice. Be patient and read every popup in winflash…don’t take flashing too lightly as many of you know it can ruin your machine or add 8 hours to this simple task.
After the flash reboot and go into the bios setup and adjust settings as desired. Don’t forget the date and don’t necessarily go for any over-clock settings yet. Keep in mind that any CMOS reloaded configurations (DFI) will not likely boot, as the slightest differences between bioses will usually kill all that hard work (so take notes if there are critical settings like memory timings you want to use again).
Boot into windows and install the two utilities systool and RM clock. Both are very small programs and both ironically have a little cog wheel icon. The RM clock will be used to control the processor’s voltage and divider (FID) in real time. Systool will be used to find your maximum FSB setting AFTER setting up RM clock and initial cool and quiet bios settings, but any FSB setting tool will work in place of systool.
Setting up RM clock.
Launch the program and by default you see what looks like a lot of settings and 4 tabs. It looks crazy but you need only make a few changes initially.
First we are going to allow half dividers (i.e. 9.5, 10.5 etc) and enable low power control by selecting the ‘Advanced’ tab, making sure ‘FID/VID Change Enable’ is selected, making sure ‘Allow Half FIDs’ is selected, and making sure ‘CPU low power enable’ and ‘Northbridge low power enable’ are also selected and then click apply. It will ask you to restart the program….say ‘YES’ and it will come back up. The rest of the defaults are fine.
Next, click on the Management tab. Here we will set the low and high power states. Note: nothing will happen until you activate RM clock so don’t be afraid…YET. First, enable ‘Use P-State Transitions (PST)’. Now you see one editable entry in the box (which will eventually be displaced by two that we create).
Click Add and a box will pop up with ONLY the divider available for selection. Choose a low divider such that this number multiplied times the highest FSB you expect to attain is equal to 80-90% of the stock processor speed. For example the 4400+ stock speed is 2.2 Ghz so I’m shooting for 1.7 to 2.0 Ghz. It is a good thing to know at this point what the most likely FASTEST speed will be for these settings. In my case, the maximum FSB / Divider setting (and best overall memory throughput) happens to be 262 FSB at 10.5 divider (FID) or 2.76 Ghz. I chose anything under 2.0 Ghz for the low-end (under voltage) setting so I chose the divider to be 7.0 for the COOL and quiet setting. Now you set the voltage. Click this new ‘0’ state with the 7x divider to highlight the entry, click modify, and set the voltage to 1.1. Now you have two entries in the window…the original and the new setting. Click on the original setting and click Delete. Now click Add and put in the multiplier that is the highest you would use to over-clock your system. In my case it was 10.5. Now…choose your voltage. In this first pass DO NOT EXCEED 1.275 volts as the REAL setting will be 123% of 1.275V or 1.57V. After you have two settings that look right as your low and high, click Apply. Nothing will happen until you choose an ‘AC Profile’ and click Apply as well. There are really 3 settings here…. Minimal, maximal, and automatic. Once everything is set the way you want, later you will set this to Automatic. For now, select minimal and click apply. This will force your CPU to the lower of the two FID/VID settings we just created. You can use the built in monitoring tool to check if it’s working (which doesn’t always work), or you can check it with cpu-Z which does always work. Next, set to maximal and observe the changes again. Now is a good time to do a little math to see if your board is behaving as expected.
There’s nothing to adjust on the ‘Monitoring’ tab…but it’s cool to look at.
Now click on the general tab. This is mostly informational, but now click on save information and save it to my documents. By default the program will not launch with windows….here you can set the appropriate settings that you desire…like start minimalized, run automatically at startup, etc. I suggest that you NOT click Restore CPU defaults on exit. I do not like the idea of a transition out of this now well-controlled voltage to something that could end up auto*123% so leave it alone.
Now…. Time to reboot and set up the bios for cool and quiet!
Here are the list of options in the Genie Bios section of the bios menu that we will MOSTLY not change…I will provide the settings that I think you should use next to each in the list (The Voltage settings and turning CnQ ON are the most important):
DRAM Configuration: your call…faster timings require lower FSB and vice versa
FSB Bus Frequency: We are going to use systool in windows…so set it to 200 to start
LDT/FSB Frequency Ratio: set to 3 as this number * FSB should be =< 1000
LDT Bus Transfer Width: leave at 16 up and down
CPU/FSB Frequency: set this to auto….you can’t impact this with CnQ ON PCI eXpress Frequency: leave at 100 (IMHO don’t exceed 108)
K8 Cool’n’Quiet setting: set to auto or enable, whichever turns it ON
Cool’n’Quiet MAX FID: set this to auto…. and RM clock will ignore this setting
CPU VID StartUp Voltage: IMPORTANT… set to 1.125 V to start and observe boot voltage which should be around 1.328 V. Each upward incremental change can have up to a 0.1V increase effect on actual boot voltages. Do NOT exceed 1.175 V in first pass test with FSB set to 200
CPU VID Control: leave at auto
CPU VID Special Control: set to 123%. IMPORTANT… This is the place to be careful. In order to take advantage of automatic voltage control the previous setting, CPU VID control must be set to auto. That means that the CPU is going to define the voltage which is typically 1.26 to 1.32 Volts depending on mobo/power supply etc. This means at 123% the actual is going to be 1.55 to 1.62 V. In theory these are not catastrophic voltages, although 1.62 is getting close. Once you have your settings done in RM clock…these voltages will be controlled entirely by RM clock and if you set it right you should never see dangerous voltages. Obviously some of you will probably want to go higher than this…and it will be possible since you can set RM clock as high as 1.35 V which translates to approximately 1.66 Volts. Finally, an option to make sure your voltage will be in the right ballpark is to set this first to 113% boot at 200FSB and check your voltage with cpu-Z. Divide the voltage you read by 1.13 and multiply by 1.23 to figure what your voltage will be when you set it to 123%. If this is acceptable to you (and your CPU) then you should set it and have no problems.
LDT Voltage Control: leave stock.
Chip Set Voltage control: leave stock (remember…cool and quiet…not on fire), but your choice.
Dram Voltage Control: This is tricky cause it is restricted with CnQ enabled…set this to the maximum voltage your dimms can handle. The range available is 2.6 to 3.2 which makes it a little hard to overclock your VX gold OCZ memory. Hopefully Oskar Wu or some other guru will fix this for us.
That wasn’t so hard was it…. Now hit F10, save settings, and pray!
Once your comp is booted into windows… bring up cpu-Z (which you better have by now or you shouldn’t even be thinking about this!).
You voltage should be in the 1.5 range (at the 123% setting) and your divider should be the default for your CPU.
Now, bring up the RM clock utility, click on the management tab, choose the minimal setting’ in ‘AC profile’ and click apply. Check cpu-Z. Your voltage and divider should have dropped to the low setting you set in this management tab of RM clock. If all has gone well so far, your voltage should be right around the stock voltage for your processor. In my case, stock is 1.3V and is reading 1.29V (at the minimal setting). If yours is reading higher then I suggest that you change the voltage for the high setting that we set at 1.275 (1.5+) and modify it down a bit. You can always go back up later. After tweaking this voltage setting now select the ‘maximum’ setting in ‘AC profile’ and click apply. Check your voltage. If it’s where you want it for max overclocking then you are done otherwise change the voltage in single tick increments until the maximum value is where you want it. If satisfied you can click the appropriate items in the General tab such as load with windows etc. I would also suggest for now that you go back to the management tab and select ‘automatic’ for the ‘AC profile’ so you can see this really work now. At rest…it will go to the low setting. With a load, it will quickly ramp up (less than a millisecond) to max.
Now you are ready to find the highest FSB for the voltage and divider settings you entered as maximum.
Minimize (do not close) the RM clock utility, and run systool. There are LOTS of things you can do with this tool including change every memory setting within windows, but we’re not going to do that now. Click on CPU overclocking. This tool will allow you to send blocks of memory through your CPU and test stability. It can automatically change your FSB in approx. 1 Mhz increments. At the top, choose your Clock Generator (typically nForce 4), and select a test pattern size of 8megs. Anything less is unlikely to yield accurately stable FSB settings. Now…click the ‘Read’ button about halfway down. You should see an accurate FSB reading (Note: multiplier readings are NOT accurate). At this point you probably know how high you can go to be stable and I would move the slider to a point maybe 10 Mhz under where you think it will be stable at the high power divider setting you entered in the RM clock utility. So if 277 can be achieved at your 10.5 divider setting (systool will likely display it as 10) then move the slider to 267 and click ‘Write’. If you computer crashes then you were wrong about the max FSB and when your comp reboots make sure RM clock is running, restart systool and set a much lower FSB. If it doesn’t crash you are ready to continue. We are now going to use the automatic tool that sends 8MB chunks through the CPU. Select the last three checkboxes marked ‘Direction up’, ‘Direction down’, and ‘Stop on error’ and click on the big button above them. Systool will now increment your FSB 1 Mhz at a time until the optimal FSB is found. After an error, it will drop to the previously stable FSB speed. I would suggest you subtract 2 Mhz and set it with the slider and clicking ‘Write’. Now you have two options when this is done. You can use Systool to simply set this FSB speed directly each time you boot up, or you can set this FSB in the bios. You should be able to boot after setting it in the bios because your computer is basically going to boot at a reasonably high voltage, but you may have to use systool each time.
The good news…since XP is sooooooo stable, you’ll probably almost NEVER reboot.
That’s it… you are now a cool and quiet over-clocker. We can all thank the brilliant people over at Rightmark and W1zard, the author of systool. You can also thank ME for making sense of all this and proving everyone including DFI wrong who say “You can’t overclock with CnQ enabled!”.
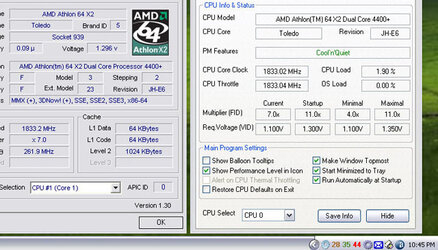
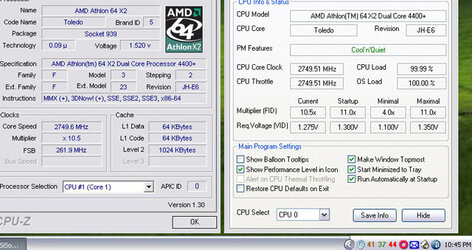
I’ve attached a few screen shots of cpu-Z at load and rest…notice the cpu/memory/northbridge temps in the lower right. Pretty cool eh? For me the northbridge temps never move from 45…partly because I have two SLI boards literally on top of it. Note: the RM clock utility doesn't properly present the actual divider on the general tab although it really is changing it as you can see by cpu-Z.
GOOD LUCK!
Please make this a sticky if admins think this is valuable.
AND IT WORKS!!!
Wouldn’t it be nice to have your comp running at 28C and extremely stable at 1.8GHZ while writing that critical paper and then automatically without ANY effort turn into a screaming and stable beast at 2.75 GHZ in battlefield 2!? This is all possible and with MOST AMD64 / nforce4 systems. And these numbers above are effortless with an X2-4400+ and ALL SLOTS filled with ram.
This guide will first take you through the bios and then through the tools (RM clock and systool) to accomplish this task relatively painlessly. This guide is a lot of words, but you will find there isn’t much you will have to do. Please read the entire guide before starting.
The test system: DFI nForce 4 SLI-DR, AMD Athlon™ 64 X2 Dual Core 4400+, 4 sticks of 512GB OCZ VX PC4000 at 3.3V
The Bios: This is a critical component and most enthusiast nForce 4 boards will have all the settings you need to make this work and work well. In this case, a semi modified bios for the DFI nForce 4 boards was chosen. The chosen bios, called 623-2bta, was originally “cleaned up” by Oskar Wu and then OCZ Tony and it was chosen because unlike the next bios iteration 704-2bta, the 623-2bta bios still INCLUDED the ‘CPU VID Special Control’ setting 123% (we’ll get to that in a moment). Suffice it so say that in order for me to truly have access to “over-clocking” voltages with cool and quiet enabled, I needed this option. There is talk out there that this setting can be dangerous…but it’s only true if you don’t do your homework and you don’t follow instructions. It can be dangerous because it automatically increases your base voltage to 123% of what it is set at whether set as ‘CPU VID startup Voltage’ or ‘CPU VID control’ which kicks in after startup. Also, you may not really need to adjust the 'CPU Vid control' to anything over 113% to get a strong overclock. In the case of the AMD X2 4400+, the “auto” settings for startup and VID control are approximately 1.3 V. With the 123% setting enabled, the voltage is set (AT ALL TIMES) to 123% of the ‘auto’ setting and thus 1.6V. This is a little high and CAN be catastrophic, especially if YOUR board produces 1.33V at its auto voltage setting. **At this time…I will insert disclaimer (I take no responsibility whatsoever for your computer and what you do with or to it)**. However if you follow this guide your CPU will not be subject to catastrophic voltages and if you are worried start out at 113%. Before we get to settings… let’s get our bios, our two tools and the latest AMD64 driver. The AMD driver is not essential to get this working but it’s advisable to have it anyway as it’s optimized to interact with XP.
The process: Download the bios, two tools, and the latest AMD driver for your processor.
A great Bios source for the DFI nForce 4 boards is here…
http://www.lejabeach.com/DFI/dfinf4ultra/dfinf4bios.html
Systool (authored by W1zzard and provided by tech powerup.com) is available here…
This is a very powerful tool, but any FSB adjusting tool that works will suffice.
http://www.techpowerup.com/systool/
The RM Clock utility ver. 1.8 (by cpu. Rightmark) is available here…
http://cpu.rightmark.org/download.shtml
The latest AMD64 processor drivers are available by clicking on the appropriate AMD64 processor type here…
http://www.amd.com/us-en/Processors/TechnicalResources/0,,30_182_871,00.html
Installation and configuration
First, check your bios… if you already have the ‘CPU VID Special Control’ setting 123% then you need not re-flash your bios. If you don’t have this setting in your bios then boot your system with STOCK speeds and find a bios that does have the 123% setting or an equivalent…. (i.e. 623-2bta in the case of the DFI nForce boards). Flash your board with the ‘new’ bios using winflash (load the bios file, check all the boxes in winflash and let her rip) or the flashing method of your choice. Be patient and read every popup in winflash…don’t take flashing too lightly as many of you know it can ruin your machine or add 8 hours to this simple task.
After the flash reboot and go into the bios setup and adjust settings as desired. Don’t forget the date and don’t necessarily go for any over-clock settings yet. Keep in mind that any CMOS reloaded configurations (DFI) will not likely boot, as the slightest differences between bioses will usually kill all that hard work (so take notes if there are critical settings like memory timings you want to use again).
Boot into windows and install the two utilities systool and RM clock. Both are very small programs and both ironically have a little cog wheel icon. The RM clock will be used to control the processor’s voltage and divider (FID) in real time. Systool will be used to find your maximum FSB setting AFTER setting up RM clock and initial cool and quiet bios settings, but any FSB setting tool will work in place of systool.
Setting up RM clock.
Launch the program and by default you see what looks like a lot of settings and 4 tabs. It looks crazy but you need only make a few changes initially.
First we are going to allow half dividers (i.e. 9.5, 10.5 etc) and enable low power control by selecting the ‘Advanced’ tab, making sure ‘FID/VID Change Enable’ is selected, making sure ‘Allow Half FIDs’ is selected, and making sure ‘CPU low power enable’ and ‘Northbridge low power enable’ are also selected and then click apply. It will ask you to restart the program….say ‘YES’ and it will come back up. The rest of the defaults are fine.
Next, click on the Management tab. Here we will set the low and high power states. Note: nothing will happen until you activate RM clock so don’t be afraid…YET. First, enable ‘Use P-State Transitions (PST)’. Now you see one editable entry in the box (which will eventually be displaced by two that we create).
Click Add and a box will pop up with ONLY the divider available for selection. Choose a low divider such that this number multiplied times the highest FSB you expect to attain is equal to 80-90% of the stock processor speed. For example the 4400+ stock speed is 2.2 Ghz so I’m shooting for 1.7 to 2.0 Ghz. It is a good thing to know at this point what the most likely FASTEST speed will be for these settings. In my case, the maximum FSB / Divider setting (and best overall memory throughput) happens to be 262 FSB at 10.5 divider (FID) or 2.76 Ghz. I chose anything under 2.0 Ghz for the low-end (under voltage) setting so I chose the divider to be 7.0 for the COOL and quiet setting. Now you set the voltage. Click this new ‘0’ state with the 7x divider to highlight the entry, click modify, and set the voltage to 1.1. Now you have two entries in the window…the original and the new setting. Click on the original setting and click Delete. Now click Add and put in the multiplier that is the highest you would use to over-clock your system. In my case it was 10.5. Now…choose your voltage. In this first pass DO NOT EXCEED 1.275 volts as the REAL setting will be 123% of 1.275V or 1.57V. After you have two settings that look right as your low and high, click Apply. Nothing will happen until you choose an ‘AC Profile’ and click Apply as well. There are really 3 settings here…. Minimal, maximal, and automatic. Once everything is set the way you want, later you will set this to Automatic. For now, select minimal and click apply. This will force your CPU to the lower of the two FID/VID settings we just created. You can use the built in monitoring tool to check if it’s working (which doesn’t always work), or you can check it with cpu-Z which does always work. Next, set to maximal and observe the changes again. Now is a good time to do a little math to see if your board is behaving as expected.
There’s nothing to adjust on the ‘Monitoring’ tab…but it’s cool to look at.
Now click on the general tab. This is mostly informational, but now click on save information and save it to my documents. By default the program will not launch with windows….here you can set the appropriate settings that you desire…like start minimalized, run automatically at startup, etc. I suggest that you NOT click Restore CPU defaults on exit. I do not like the idea of a transition out of this now well-controlled voltage to something that could end up auto*123% so leave it alone.
Now…. Time to reboot and set up the bios for cool and quiet!
Here are the list of options in the Genie Bios section of the bios menu that we will MOSTLY not change…I will provide the settings that I think you should use next to each in the list (The Voltage settings and turning CnQ ON are the most important):
DRAM Configuration: your call…faster timings require lower FSB and vice versa
FSB Bus Frequency: We are going to use systool in windows…so set it to 200 to start
LDT/FSB Frequency Ratio: set to 3 as this number * FSB should be =< 1000
LDT Bus Transfer Width: leave at 16 up and down
CPU/FSB Frequency: set this to auto….you can’t impact this with CnQ ON PCI eXpress Frequency: leave at 100 (IMHO don’t exceed 108)
K8 Cool’n’Quiet setting: set to auto or enable, whichever turns it ON
Cool’n’Quiet MAX FID: set this to auto…. and RM clock will ignore this setting
CPU VID StartUp Voltage: IMPORTANT… set to 1.125 V to start and observe boot voltage which should be around 1.328 V. Each upward incremental change can have up to a 0.1V increase effect on actual boot voltages. Do NOT exceed 1.175 V in first pass test with FSB set to 200
CPU VID Control: leave at auto
CPU VID Special Control: set to 123%. IMPORTANT… This is the place to be careful. In order to take advantage of automatic voltage control the previous setting, CPU VID control must be set to auto. That means that the CPU is going to define the voltage which is typically 1.26 to 1.32 Volts depending on mobo/power supply etc. This means at 123% the actual is going to be 1.55 to 1.62 V. In theory these are not catastrophic voltages, although 1.62 is getting close. Once you have your settings done in RM clock…these voltages will be controlled entirely by RM clock and if you set it right you should never see dangerous voltages. Obviously some of you will probably want to go higher than this…and it will be possible since you can set RM clock as high as 1.35 V which translates to approximately 1.66 Volts. Finally, an option to make sure your voltage will be in the right ballpark is to set this first to 113% boot at 200FSB and check your voltage with cpu-Z. Divide the voltage you read by 1.13 and multiply by 1.23 to figure what your voltage will be when you set it to 123%. If this is acceptable to you (and your CPU) then you should set it and have no problems.
LDT Voltage Control: leave stock.
Chip Set Voltage control: leave stock (remember…cool and quiet…not on fire), but your choice.
Dram Voltage Control: This is tricky cause it is restricted with CnQ enabled…set this to the maximum voltage your dimms can handle. The range available is 2.6 to 3.2 which makes it a little hard to overclock your VX gold OCZ memory. Hopefully Oskar Wu or some other guru will fix this for us.
That wasn’t so hard was it…. Now hit F10, save settings, and pray!
Once your comp is booted into windows… bring up cpu-Z (which you better have by now or you shouldn’t even be thinking about this!).
You voltage should be in the 1.5 range (at the 123% setting) and your divider should be the default for your CPU.
Now, bring up the RM clock utility, click on the management tab, choose the minimal setting’ in ‘AC profile’ and click apply. Check cpu-Z. Your voltage and divider should have dropped to the low setting you set in this management tab of RM clock. If all has gone well so far, your voltage should be right around the stock voltage for your processor. In my case, stock is 1.3V and is reading 1.29V (at the minimal setting). If yours is reading higher then I suggest that you change the voltage for the high setting that we set at 1.275 (1.5+) and modify it down a bit. You can always go back up later. After tweaking this voltage setting now select the ‘maximum’ setting in ‘AC profile’ and click apply. Check your voltage. If it’s where you want it for max overclocking then you are done otherwise change the voltage in single tick increments until the maximum value is where you want it. If satisfied you can click the appropriate items in the General tab such as load with windows etc. I would also suggest for now that you go back to the management tab and select ‘automatic’ for the ‘AC profile’ so you can see this really work now. At rest…it will go to the low setting. With a load, it will quickly ramp up (less than a millisecond) to max.
Now you are ready to find the highest FSB for the voltage and divider settings you entered as maximum.
Minimize (do not close) the RM clock utility, and run systool. There are LOTS of things you can do with this tool including change every memory setting within windows, but we’re not going to do that now. Click on CPU overclocking. This tool will allow you to send blocks of memory through your CPU and test stability. It can automatically change your FSB in approx. 1 Mhz increments. At the top, choose your Clock Generator (typically nForce 4), and select a test pattern size of 8megs. Anything less is unlikely to yield accurately stable FSB settings. Now…click the ‘Read’ button about halfway down. You should see an accurate FSB reading (Note: multiplier readings are NOT accurate). At this point you probably know how high you can go to be stable and I would move the slider to a point maybe 10 Mhz under where you think it will be stable at the high power divider setting you entered in the RM clock utility. So if 277 can be achieved at your 10.5 divider setting (systool will likely display it as 10) then move the slider to 267 and click ‘Write’. If you computer crashes then you were wrong about the max FSB and when your comp reboots make sure RM clock is running, restart systool and set a much lower FSB. If it doesn’t crash you are ready to continue. We are now going to use the automatic tool that sends 8MB chunks through the CPU. Select the last three checkboxes marked ‘Direction up’, ‘Direction down’, and ‘Stop on error’ and click on the big button above them. Systool will now increment your FSB 1 Mhz at a time until the optimal FSB is found. After an error, it will drop to the previously stable FSB speed. I would suggest you subtract 2 Mhz and set it with the slider and clicking ‘Write’. Now you have two options when this is done. You can use Systool to simply set this FSB speed directly each time you boot up, or you can set this FSB in the bios. You should be able to boot after setting it in the bios because your computer is basically going to boot at a reasonably high voltage, but you may have to use systool each time.
The good news…since XP is sooooooo stable, you’ll probably almost NEVER reboot.
That’s it… you are now a cool and quiet over-clocker. We can all thank the brilliant people over at Rightmark and W1zard, the author of systool. You can also thank ME for making sense of all this and proving everyone including DFI wrong who say “You can’t overclock with CnQ enabled!”.
I’ve attached a few screen shots of cpu-Z at load and rest…notice the cpu/memory/northbridge temps in the lower right. Pretty cool eh? For me the northbridge temps never move from 45…partly because I have two SLI boards literally on top of it. Note: the RM clock utility doesn't properly present the actual divider on the general tab although it really is changing it as you can see by cpu-Z.
GOOD LUCK!
Please make this a sticky if admins think this is valuable.
Attachments
Last edited:

")
 .
.