• Welcome to Overclockers Forums! Join us to reply in threads, receive reduced ads, and to customize your site experience!

My Swiftech H20-320 + HAF932 Build Thread

Overclockers is supported by our readers. When you click a link to make a purchase, we may earn a commission. Learn More.
You SURE the rad you have has for the fill port G1/4 threads?

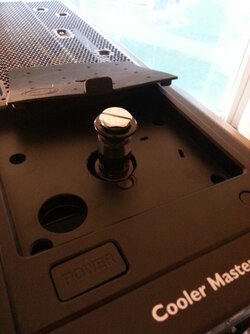
Judging from these specs, yes. However, now that I think about it I don't want to get the fill port. I want to get an additional compression fitting. I'll just get one more of the same one that came with my kit. I just tried screwing one into the fill port and fit fine.

For the fill port on the rad/res...
http://www.swiftech.com/1-2x3-4inch-LokSeal-Compression-fitting.aspx
Then some of my extra tubing that came with my kit.
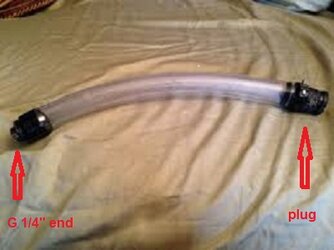
To plug the top of the tubing...
http://www.swiftech.com/12inbarb-remote-fill-port.aspx

My goal is to minimize the risk of spilling into the case.

MCR320-RES-V2-DIMENSIONS.jpg
 
Just picked up a better circular hole cutting bit. Mine were either too small or too big. I also ordered an additional compression fitting and top panel fill port. I'd like to make the filling method a little more graceful. Should be good at the end. They are also sending me an additional set of the screws used to mount the fans to the radiator for free which is pretty nice. So I won't have any problems with my push pull.

Now for the age old question. Air flow. Pull air through the rad from above the case as intake? Or exhaust through the radiator out of the top? Note that it will be a push/pull. It sounds like a lot of companies recommend pulling air through their rads from outside the case, but then a lot of people recommend keeping the natural flow of the case intact. Such as the top exhaust flow of the HAF 932/X cases.
 
As per Conumdrum, please make sure it is G 1/4". Just ask Swiftech. It should be, but one can't be too certain...

If you wish, you can make a fill-tube like this photo that will screw on an off the radiator's reservoir if all is G 1/4". That allows one to do the pouring over a basin or strategically located towels. Sometimes you have to squeeze to get a little siphon going but it works for me as an internal fill-tube that I zip-tie down internally.

The G 1/4 end could either be a barb or compression, whatever you have around, and you can get a 1/2 (or 3/8") plug to fit the tubing.

There is even a funnel that screws into the G 1/4" plug when you remove the end, but the funnel is small.

If the pic looks familiar, some of us use this type of "fill-tube" as a "drain-tube" connected to a T-fitting. Hope this gives you some ideas. Good luck. :)
---
add:
Sorry I got behind. Thanks Conumdrum. But I just now saw that last question. IMO, focus on good case air-flow. Set it up most convenient and see if it's OK. Then, when you get an itch during a tear-down, you change it and re-measure your load testing. For me, I did that and found no change in my load temps either way. So for me, it makes no difference. Just my observation/opinion...
 

Attachments

  • fill tube2.jpg
    fill tube2.jpg
    30.6 KB · Views: 208
Last edited:
The reason companies recommend that is the cooler the air, the better performing. They have a vested interest in that.

Many who have a 240 at the bottom intake and at front fans and exhaust out the top rad and back fan. Or the airflow in the case can be fully reversed. With good airflow from front to top yes the air temp will be a few C higher. usually with a well radded loop that few C higher air temp means your stuff will be 3C higher, but so far below any issues (even in a quiet rig, just stick with normal case airflow.

But, for your current setup reversing all the fans to blow out the bottom/front you'll sea bit better temps. With your raddage and fannage you don't need to though, and no reason for push/pull either. Your Dt will be fine with 3 fans at 1000 RPM.
 
As per Conumdrum, please make sure it is G 1/4". Just ask Swiftech. It should be, but one can't be too certain...

Yep it is. It is the same model that came with my kit. And I already ordered a top fill port w/ stopper from Swiftech so we are good there.

The reason companies recommend that is the cooler the air, the better performing. They have a vested interest in that.

Many who have a 240 at the bottom intake and at front fans and exhaust out the top rad and back fan. Or the airflow in the case can be fully reversed. With good airflow from front to top yes the air temp will be a few C higher. usually with a well radded loop that few C higher air temp means your stuff will be 3C higher, but so far below any issues (even in a quiet rig, just stick with normal case airflow.

But, for your current setup reversing all the fans to blow out the bottom/front you'll sea bit better temps. With your raddage and fannage you don't need to though, and no reason for push/pull either. Your Dt will be fine with 3 fans at 1000 RPM.

So sounds like this really is a non issue. I like the idea of reversing the air flow though. Do you think one 140mm Noctura fan in the rear could handle my exhaust if I decided to do intake through the rad as opposed to exhaust? I'm not really that considered with my GPU temps if exhaust isn't optimal. I'd prefer to have the CPU at best temp especially as the 3770K isn't the best at handling heat.

The pieces are seriously coming together now. I got my plan for filling up, mounting, tube locations. End of next week I think this will be done. I am planning on filling up the rad/res outside the case at first and running it with the pump/block outside as well to test for initial leaks and to prime it/get rid of bubbles. Gonna let it run for a day or two before moving it into the case. I'll be mounting it all in the case before I do this to make sure everything fits appropriately and so I know my tube lengths, etc. Wont be running it obviously as it will be dry.
 
Intake through the rad? Front case fans need reversed also. 100% reversal of case flow.

Non-issue in my book. With a 120x3 as a CPU only loop for now temps will NOT be an issue. As far as the WCing is. The CPU, you applying TIM right etc is the only issues. And your not a noob when installing CPU coolers. But as always, install, remove, check TIM app, see your pattern is good, adjust your done. I always do that with a new type of stuff. Even my air cooled media rig I installed the CPU cooler, removed, adjusted my TIM app, been a long time since I did an air cooled setup.
 
Yea I think that is what I'm going to do. Just reverse em, why not.

I'm not too concerned with the TIM application. I actually picked up IC Diamond which gets rave reviews. It sounds like it is a pain to get it out of the tube, but everyone recommends you just push a pea size amount onto the center of the CPU and put the block right on it and let it spread by itself. Easier than spreading it yourself.
 
Hehe, I haven't spread it myself in years. For CPUs a blot the size of a grain of rice, smaller than a small pea. Squish. Tiny twist on the block/cooler, and an anal attention to cross tightening, one turn at a time till ...... wait for it..... finally done.

Some info in the stickies on my build logs. Have pics of TIM app.

And my 'blot'.
http://www.overclockers.com/forums/showpost.php?p=6489396&postcount=3
 
Very cool sticky.

Here is what I think I am going to do for airflow.

Rear intake using a Noctura 140mm
Top intake through the radiator using 6 x Akasa Viper 120mm PWMs in push/pull
Top Front 5 1/4" bay exhaust using a Noctura 120mm
Bottom Front exhaust using the stock Cooler Master 230mm fan
Side Fan intake using 4 x Helix 120mm PWMs

I do not like the sound of my Cougars at all so I think I'm going to RMA them or save them for some misc project but I don't want them in this build. Are they overly loud? No, but they have this annoying whiney/bitchy sound which by that I cannot abide. The bottom two marked Future are the two that I was going to use my Cougars for. I still want the very bottom to be intake as it could help with my hard drive temps and perhaps a bit with the GPUs. I'm not concerned with that interrupting the flow as I'd have the exhaust fan right above it. just to help get some cool air into the hard drive area.
 

Attachments

  • Airflow.jpg
    Airflow.jpg
    67.2 KB · Views: 203
The whine that is missing from the AP-15 fans is what makes them so special. Why when released you couldn't get them. Stock would come in, bam gone again. Prices rose. I got them early.

The bottom future fan should be exhaust. It will help pull air through the rad. You want negative pressure for case flow with a rad, always making more airflow to help the rad fans. Never restrict it.

If you do the unneeded push/pull, that bottom fan would hurt airflow.

Anyhoo, you run some good tests however you set it up, reverse the fans and try again and edumacate us folks.

You never read that sticky? Every sticky matters to become one with watercooling........

No shortcuts............
 
There are a lot of stickies :D. I've read most of em.

Yea I wouldn't mind picking up two of the AP-15s to see what the fuss is about. I'm pissed about these Cougars. These Akasas though, they move a TON of air and are not quiet at all at max speed. However, I compare their noise to like an American muscle car, a nice manly low end sound as opposed to a these Cougars which remind me of a POS beat up sedan with a screw on exhaust pipe from Wal-Mart.


REVISED!
 

Attachments

  • Airflow.jpg
    Airflow.jpg
    67.2 KB · Views: 202
Last edited:
Well alright! Everything is in place, cooling wise. Currently bleeding. I will be posting some pictures very soon. I'm watching the tubing very closely so I can't be distracted at the moment.

Using an old PSU from an old old Dell desktop to power the block/pump for the bleeding.

How long does bleeding take on average? I plan on letting this run for awhile before I put my GPU back in and really go live with it. So far no leaks.

EDIT: It... Is... ALIVE!!!

BTW... Conumdrum, heated up the circular drill bit with a butane torch, cut through the plastic top casing LIKE BUDDAH.
 
Last edited:
MattMan, that is smart thinking outside the box!

Bleeding is the beginning process of getting rid of bubbles. In the past, I spend a few hours bleeding to get rid of most of them. Then I sleep. I have left the rig on overnight early on, but really no reason. You'll have to keep checking the water levels when turned on, and since you got a top rad. you should seal the fill port and tilt the heck outta case case (90) and bump the pump and see what happens. Top mounted rad bubbles can be an issue. After a few days just check water levels after boot up and shutdown.

2-3 weeks you'll need to add a teeny bit maybe, then weekly peeks at the res level. Then every few months...
 
Sounds good. When I first filled it up I was tilting it quite a bit like you said and lots of big *** bubbles were rising up from the pump. I did this for maybe 20 minutes before I even turned the pump on to try and get as much out as possible. Kept checking water levels quite often and still am as I continue the bleeding.

My chimney idea came out great. I'm very very happy with it. Makes checking the water levels super easy and filling is even easier. As you can see in the picture below, I have a piece of the tubing that came with the kit, sticking out of the hole I drilled out. This tubing is connected to the top res fill port via a compression fitting, and is sealed at the top with a fill port that traditionally would be flush with the top of a case. What I do is I fill up the res through the chimney until I see water the water level rise up the tubing. Once I see it rise I know it is as full as I can get it right now. I will then tilt the case a bit to try and get some more bubbles out. So far it is working great. I am leaving it open so air can escape, and once the bleeding is done I will fill it up to the top and cap it.
 

Attachments

  • 20130430_211624.jpg
    20130430_211624.jpg
    982.1 KB · Views: 298
Some More Pictures

More pictures.

Group shot of most of the gear, picture of the fill port tubing without the rubber cover, and the Apogee Drive II on the Mobo. I decided to upgrade to IC Diamond thermal paste over AS5. Figured why not, at least don't need to worry about it being conductive.

More pictures coming tomorrow. As the initial results.
 

Attachments

  • 20130430_192328.jpg
    20130430_192328.jpg
    981 KB · Views: 183
  • 20130429_173529.jpg
    20130429_173529.jpg
    1.1 MB · Views: 185
  • 20130430_201945.jpg
    20130430_201945.jpg
    383.5 KB · Views: 181
Thanks. Here is a screenshot of my initial temps. No OC obviously, need to break it in for a few more days. It looks like my VCore is too high for the current CPU Clock range. Note, this clock is just Turbo Mode set by the mobo. I think the mobo is sensing that the CPU is running cooler so it can clock higher, then automatically raising the VCore. I'll play around with this once I break it in more. It should help the temps, especially on Core #1 which runs a little hotter. I have a feeling this is due to the heat dissapation problems with Ivy Bridge because it ran hotter on my old setup too by about the same margin. The other cores rarely hit 30C (range 25 give or take) and stay close together so I think the TIM application is fine. I'm using SpeedFan to control the pump speed based on Core #1 as it runs hotter.

More pictures of final build coming today.
 

Attachments

  • Initial Temps.jpg
    Initial Temps.jpg
    267.5 KB · Views: 174
More pictures of the cooling. I lowered the USB 3.0 front panel and my disc drive so I would have room for a fan in the empty 5 1/4" bays. I setup a Noctura 1500rpm as exhaust here because I reversed the flow of my case to allow better flows for intake through the rad. I mounted the Noctura on top of the disc drive using a slab of super sticky Sorbothane and then using some twist ties on the top corners to hold it into the case further.

Also replaced the side 230mm with 4 Swiftech Helixes. I took the three Helixes that come with the H20-320 Elite kit, purchased one more, and put em on the side. They are hooked up to a Swiftech 8-way PWM splitter which draws power from the PSU and PWM from the Mobo. I'm going to get some fan grills for these four fans soon.

More pics of the radiator Akasa push/pull, and pump/block and tubing in action coming soon.
 

Attachments

  • 20130501_125052.jpg
    20130501_125052.jpg
    511.5 KB · Views: 169
  • 20130501_123531.jpg
    20130501_123531.jpg
    330.3 KB · Views: 174
  • 20130429_173617.jpg
    20130429_173617.jpg
    638.5 KB · Views: 170
Back