• Welcome to Overclockers Forums! Join us to reply in threads, receive reduced ads, and to customize your site experience!

My Swiftech H20-320 + HAF932 Build Thread

Overclockers is supported by our readers. When you click a link to make a purchase, we may earn a commission. Learn More.

MattMan657

Member
Joined
Mar 14, 2013
Location
Massachusetts
Well the time has come to begin my first legit water cooling build. I'll be doing this over the next few days as I don't feel like rushing and want to take my time to ensure perfection. Hopefully I haven't screwed anything up yet :D

First few notes and questions...

---The Swiftech packaging was great. No issues there. Tons of packaging peanuts and everything in their own inner box. No complaints in any way.
---I cleaned the whole length of tubing while waiting for the water to boil. Cleaned the tubing with hot water and a little bit of dish soap and thoroughly rinsed again. Going to rinse again with distilled.
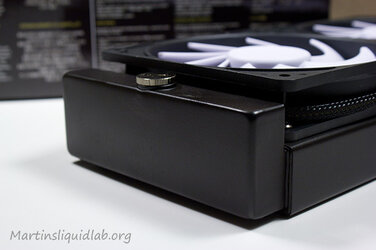
---Something I was not expecting on the rad is that the screws that come in place where the tubing goes are not strong screws. It seems they do this as you are going to remove them for the compression fittings anyway. Just little place holder plastic screws so stuff doesn't get into the rad. What this caused is water so splash around a decent amount when cleaning the rad. Got some on the fins so hopefully that isn't a problem. :screwy:
---A couple fins were slightly bent in the process. Nothing major, but I just bent them back into place. I do need to be more careful with this though.
---Went through the cleaning process. I was actually surprised how clean the rad was straight out of the box. No debris at all really, however I still went through the steps in the sticky to ensure. Going to do one more rinse through with distilled water to be triple sure.
---Because in my kit the pump and block are one unit, what would be the best cleaning method for this? In the sticky it says do not open the block, but it says open the pump and rinse? Ideas? :shrug:

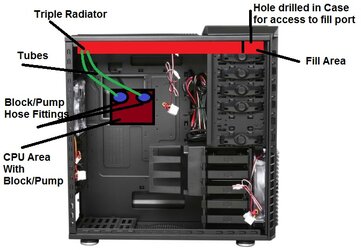
Once I do my final rinse I will let the rad dry and I will begin the planning stages. I have a very solid idea of what I am going to, I plan on posting an image of my idealized layout shortly to get some opinions.

Stay tuned for before pictures and gear pictures.
 
Here is my diagram. I may have to rotate the block/pump to allow easier access to my ram, but no biggie if I do.

I know I know, this is going to be a simple water cooling build. It is my first build and I think this kit is going to be a great way to get my foot in the door.

Comments? Suggestions? Concerns? Am I going to totally destroy this project?
 

Attachments

  • Setup Diagram.jpg
    Setup Diagram.jpg
    68.8 KB · Views: 1,560
Yeah, those included stop fittings in the rads are just to make sure nothing gets into it between the factory and your house. Very flimsy. I had to use actual BP stop fittings during my rad dance :p

As for the block, no need to disassemble it right now. Just flush with distilled and you'll be good. You will want to tear it down for the annual teardown though, but no point in doing that right away as it will probably be fairly clean from the factory. That and you'd be voiding the warranty on it if you open it right away.
 
The pump: Pour some water in it and slosh it around. Drain into a glass bowl, look for stuff. No stuff? Good enuff.

I put my thumbs over the rad holes. They aren't made to be water tight. Water on the fins is fine. In the annual major cleaning, I ran run hot water all over the outer rad surfaces, then took them outside and used a compressor to blow it out and let it sit in the sun for a few hours Never been an issue.

Bent fins? Wait you got a 5 year old rad, it happens. A toothpick works great.
 
Congrats on the h320.

I have a 932 with a 120.3 up top. Wanted to share that in spite of several configurations, I never got the Coolermaster stock fill-port under the rubber mat to work with my custom loop. I found out it was designed for an older Coolermaster product.

I have also had my radiator ports on front and back and can't say one way is best.

My point is if you don't have to drill your fill-port holes right away, you may want to see how others mount it. It seems at first like it would be easier to cut through the mesh in back and smooth it out with a Dremel rather than cut through the metal and plastic in the front. My concern is the cheap plastic in front under the mat may crack if drilled. Perhaps I am wrong - only sharing my experiences. Good luck. :)
 
Yea I've been looking at pictures online. How did you end up setting yours up?

Slightly annoyed. One of my Swiftech 8 way PWM splitters is DOA. Need another for my Akasa fans (for the rad push/pull). I tested them out just direct to the mobo. Those things push a ton of frigging air. Not too happy with the couple Cougars I picked up either. Both of them have a whiney noise. Might RMA them and just get a single Noctura.
 
Had a really weird problem last night with my fans. The Asus P8Z77 WS mobo has a jumper for 3 or 4 pin fans. I had it set to 3 originally as all my fans were 3 so I switched it to 4 last night as all my future fans will be 4. Note this jumper is only for the Chassis fans, not for CPU fans.

For some reason as soon as I moved the jumper over the fans starting operating SUPER slow. It was very very odd. Even the 4 pin fans. I switched the jumper back and everything was fine. Oh well. Side 230mm now replaced with my four Swiftech Helix 120mms. They are pretty damn loud at max speed (1800rpm). Using SmartFan to keep em down to round 1200-1400rpm.

EDIT: Just got off the phone with Swiftech, sending me out a new 8 way PWM splitter free of charge no questions asked. Only a little splitter, but still great customer service.
 
Last edited:
Yea I've been looking at pictures online. How did you end up setting yours up?

I now have my fittings at the back of the case but not sure one way is better. Each has its own pros and cons. It's now a little tight now between the fittings and CPU block and I accidentally introduced a tight bend during a very short run of rad > CPU in. It's only cosmetic but I look forward to fixing it better at the 12 month maintenance than during my 6 month coolant change. I now have an extension and several angled fittings and stiffer Masterkleer tubing so am prepared, lol. I change configurations because it's fun and always teaches me something...it's part of the hobby. :)

Performance shouldn't matter at which end you have your fittings. What may be important for convenience is the location of your reservoir fill-port. You can wait. Or you can drill out the case to 1" and smooth the burrs or finish it off with a water fill-set with a stop fitting or fill-port if there is room. I was simply cautioning you about using the stock fill-port in front because many have tried and given up on that. I suggest you ponder a bit before choosing where to drill the case. That plastic up front holds your I/O cabling and although replaceable from Coolermaster, would seem a hassle if it cracked.

If I had to drill now, I would drill out the back to 1" and put a fill-port if room. If no room, just drill it out more and leave it open but smooth out any rough edges with a Dremel. The picture from Martin looks like the fill-port will be close to the case top. I suggest you read Martin's entire review on the H220 carefully, especially the installation section.

http://martinsliquidlab.org/2013/01/27/swiftech-h220-prefilled-2x120mm-water-cooling-kit/

If you don't have to drill for a while, Swiftech may give some hints and the forums may fill with pictures of the H320. The units have to checked and filled at some point, eh? The easiest fill now may be using a sport drink bottle with nozzle into the reservoir since it holds little coolant. Or you can make a removable fill-tube with a spare fitting/tubing/plug. But someone may get more creative. Have fun. :thup:
 

Attachments

  • swiftech-h220-60.jpg
    swiftech-h220-60.jpg
    40 KB · Views: 865
Orly? I can totally see that happening. Have a source on this intel?
 
OP, it appears I made a mistake on your model since no one has seen the H320 All-in-One yet. I did not see "Elite" or "Edge" in your title so thought you were asking about the H320 All-in-One.

To solve this mystery, do you have the H2O-320-Elite with the Apogee Drive II?

If you have the Elite...Although the radiators are both L-shaped with built-in reservoir and look similar, Swiftech says horizontal mounting disables the reservoir in the Elite model (under the Support tab). This makes my information about accessing the radiator fill-port through the top of your HAF 932 irrelevant if the reservoir won't function with horizontal mounting. It reads to me like the res functions only when vertical at the top.

Again, my apologies but I was mostly trying to caution about drilling into the cheap plastic that holds on the 932 I/O panel. Otherwise, if you have questions about drilling holes in the 932 case, please ask. Good luck. :)
 
Yes I got the H20-320 Elite. Pretty sure those specs are for the tubing inlet/outlets. Not the fill ports.

In reality, the rad with this kit needs to be setup like the rad with the H220 AIO to use the built in res functionality. I've been looking at pictures on the Swiftech forums with the Elite and the Edge kits in HAF 932/X cases. Looks like you have to drill a hole or you're going to be removing the rad every time you need to fill it up.

Still TBD if I'm going to drill the plastic in the front or the metal mesh in the back. I'd honestly prefer to do it in the front to avoid possible spill ins near the mobo. I think I could cut it. I have a powerful drill and could always heat the drill bit up with a butane torch. Cut through it like buddah. :D

What I did today
----------------
--Got Swiftech on the phone for a replacement 8 Way PWM Splitter for my rad push/pull setup. Sending me a new one free of charge, couldn't have been better about it.
--Cleaned out the rad again with distilled water to ensure it is nice and clean
--Cleaned out the tubing again with distilled like above
--Rinsed out the Apogee Drive II block/pump with distilled.
--Began to look at how the rad will mount to the top of my case.
--Fooled around with the tubing and compression fittings. Was actually very surprised to see how easy these link up. I'm no expert on fittings but these Swiftech ones look pretty nice.
--Research and reading

Not a big day for the build. Had a busy work day.
 
MattMan657, glad to hear I didn't mess anything up for you. I cut through all the steel parts in that case without issue but saw a broken I/O case panel pic with attempted plastic cut. Coolermaster is happy to sell the new part though, lol. Glad you have the tools and skills to finally make that front fill-port work for you. Will be fun to watch. :)
 
Hole cutting will commence this weekend.

Musicfan, the fill port links got me thinking. I don't think a port like that would fit in the case as the fill port on the rad will be very close to the top of the case.
So... I'm thinking about getting http://www.swiftech.com/remotefill-portfittingformcresmicrorev2.aspx , mounting that to the fill port on the rad, and getting an inch or two of tubing to stick out of the hole I drill, allowing me to fill up the rad/res very easily outside the case. I would then need a little stopper for the top of the tubing sticking out. Would look like a chimney.

It looks like it would fit. The diagram of my rad shows that the fill port is a G 1/4 and the fill port fitting is a G 1/4 x 1/2 barb. I'm assuming that 1/2 barb means you would need tubing with 1/2" inner diameter, which is what comes with the H20-320 Elite.

Good? Bad? Am I going nuts with anticipation? Just realized I could also do this with an additional compression fitting. Would just get the same kind that came with my kit. I like this idea more as there might not be room for a hose clamp on the fill port. http://www.swiftech.com/1-2x3-4inch-LokSeal-Compression-fitting.aspx
 
Last edited:
You SURE the rad you have has for the fill port G1/4 threads?

If so they have such things availble in the wild. Make sure the fillport is xx thread pattern and find a nice way to make it work.

My thought is to cut a hole in the case big enuff to remove the rad plug. Stick a cheapo funnel in the hole and fill. You gotta be ohh so careful not to fill the funnel. Pre-putting a absorbent thing around the hole under the case top like a bit of a kitchen sponge to absorb the bit or drips could help.

Ramble off
 
Back