Table of Contents
ASRock has long been known to be a budget or ‘bang for your buck’ type motherboard maker… and things haven’t changed much at all in that regard. ASRock brings quality boards to the table, and usually at a lower price than other major board manufacturers. Over the past couple of years, ASRock has come out with some very solid budget boards and high-end enthusiast level boards in the P67, Z68, X79, as well as AMD platforms.
Now, ASRock has teamed up with world renowned overclocker, Nick Shih, to take a stab at making a high-end overclocking based, yet functional for all users, motherboard named the Z77 OC Formula. Let’s dig in and see what they did to make this thing work.
 |
Specifications & Features
At a very high level you have a board that is seemingly made for overclocking. From the robust cooler around the power delivery area (which also has preinstalled water cooling inlets/outlets to keep the 12+4 phase power parts cool), the ability to disable PCIe slots on the board for easy troubleshooting of multi GPU setups, to the onboard + or – overclocking buttons when pushing to the brink of stability… it’s seemingly all there.
Below is a specifications list sourced from the ASRock website. In that list is everything you would want to know. Below this list are some more details on the features this board has that can set it apart from all the rest.
| General | |
| CPU | – Supports 3rd and 2nd Generation Intel® Core™ i7 / i5 / i3 in LGA1155 Package – 12 + 4 Power Phase Design – Supports Intel® Turbo Boost 2.0 Technology – Supports Intel® K-Series unlocked CPU – Supports Hyper-Threading Technology |
| Chipset | – Intel® Z77 – Supports Intel® Rapid Start Technology and Smart Connect Technology *Intel® Rapid Start Technology and Smart Connect Technology are only supported under Windows® 7 OS or later versions. |
| Memory | – Dual Channel DDR3 memory technology – 4 x DDR3 DIMM slots – Supports DDR3 3000+(OC)/2800(OC)/2666(OC)/2400(OC)/2133(OC)/1866(OC)/1600/1333/1066 non-ECC, un-buffered memory – Max. capacity of system memory: 32GB* – Supports Intel® Extreme Memory Profile (XMP) 1.3 / 1.2 *Due to the operating system limitation, the actual memory size may be less than 4GB for the reservation for system usage under Windows® 32-bit OS. For Windows® 64-bit OS with 64-bit CPU, there is no such limitation. |
| BIOS | – 2 x 64Mb AMI UEFI Legal BIOS with GUI support (1 x Main BIOS and 1 x Recovery Backup BIOS) – Supports “Plug and Play” – ACPI 1.1 Compliance Wake Up Events – SMBIOS 2.3.1 Support – CPU Core, IGPU, DRAM, 1.8V PLL, VTT, VCCSA Voltage Multi-adjustment |
| Audio, Video and Networking | |
| Graphics | – Supports Intel® HD Graphics Built-in Visuals : Intel® Quick Sync Video 2.0, Intel® InTru™ 3D, Intel® Clear Video HD Technology, Intel® Insider™, Intel® HD Graphics 2500/4000 with Intel® Ivy Bridge CPU – Supports Intel® HD Graphics Built-in Visuals : Intel® Quick Sync Video, Intel® InTru™ 3D, Intel® Clear Video HD Technology, Intel® HD Graphics 2000/3000, Intel® Advanced Vector Extensions (AVX) with Intel® Sandy Bridge CPU – Pixel Shader 5.0, DirectX 11 with Intel® Ivy Bridge CPU. Pixel Shader 4.1, DirectX 10.1 with Intel® Sandy Bridge CPU – Max. shared memory 1760MB with Intel® Ivy Bridge CPU. Max. shared memory 1759MB with Intel® Sandy Bridge CPU – Supports HDMI 1.4a Technology with max. resolution up to 1920×1200 @ 60Hz – Supports Auto Lip Sync, Deep Color (12bpc), xvYCC and HBR (High Bit Rate Audio) with HDMI (Compliant HDMI monitor is required) – Supports HDCP function with HDMI port – Supports Full HD 1080p Blu-ray (BD) / HD-DVD playback with HDMI port *Intel® HD Graphics Built-in Visuals and the VGA outputs can be supported only with processors which are GPU integrated.**Due to chipset limitation, the Blu-ray playback of Intel® HD Graphics is only supported under Windows® Vista™ and Windows® 7.***Intel® InTru™ 3D is only supported under Windows® 7 and Windows® 7 x64. |
| Audio | – 7.1 CH HD Audio with Content Protection (Realtek ALC898 Audio Codec) – Premium Blu-ray audio support – Supports THX TruStudio™ |
| LAN | – PCIE x1 Gigabit LAN 10/100/1000 Mb/s – Broadcom BCM57781 – Supports Wake-On-LAN – Supports Energy Efficient Ethernet 802.3az – Supports PXE |
| Expansion / Connectivity | |
| Slots | – 2 x PCI Express 3.0 x16 slots (PCIE2/PCIE4: single at x16 (PCIE2) / x8 (PCIE4) or dual at x8/x8 mode) – 1 x PCI Express 2.0 x16 slot (PCIE5: x4 mode) – 2 x PCI Express 2.0 x1 slots – Supports AMD Quad CrossFireX™, 3-Way CrossFireX™ and CrossFireX™ – Supports NVIDIA® Quad SLI™ and SLI™ *PCIe Gen3 is supported on 3rd Generation of Intel® Core™ i5 and Core™ i7 CPUs. |
| Storage | – 2 x SATA3 6.0 Gb/s connectors by Intel® Z77, support RAID (RAID 0, RAID 1, RAID 5, RAID 10, Intel® Rapid Storage and Intel® Smart Response Technology), NCQ, AHCI and “Hot Plug” functions – 4 x SATA3 6.0 Gb/s connectors by Marvell SE9172, support RAID (RAID 0 and RAID 1), NCQ, AHCI and “Hot Plug” functions |
| USB 3.0 | – 2 x Rear USB 3.0 ports by Intel® Z77, support USB 1.0/2.0/3.0 up to 5Gb/s – 4 x Rear USB 3.0 ports by Etron EJ188H, support USB 1.0/2.0/3.0 up to 5Gb/s – 1 x Front USB 3.0 header by Intel® Z77 (supports 2 USB 3.0 ports), supports USB 1.0/2.0/3.0 up to 5Gb/s |
| Connector | – 4 x SATA2 3.0 Gb/s connectors, support RAID (RAID 0, RAID 1, RAID 5, RAID 10, Intel® Rapid Storage and Intel® Smart Response Technology), NCQ, AHCI and Hot Plug functions – 6 x SATA3 6.0 Gb/s connectors – 1 x IR header – 1 x CIR header – 1 x COM port header – 1 x HDMI_SPDIF header – 1 x Power LED header – V-Probe™: 2 x 7-set of onboard voltage measurement points laid – 2 x CPU Fan connectors (1 x 4-pin, 1 x 3-pin) – 4 x Chassis Fan connectors (1 x 4-pin, 3 x 3-pin) – 1 x Power Fan connector (3-pin) – 1 x MOS Fan connector (3-pin) – 24 pin ATX power connector – 8 pin 12V power connector – 4 pin 12V power connector – SLI/XFire power connector – Front panel audio connector – 3 x USB 2.0 headers (support 6 USB 2.0 ports) – 1 x USB 3.0 header (supports 2 USB 3.0 ports) – 1 x Dr. Debug with LED – 1 x Power Switch with LED – 1 x Reset Switch with LED – 1 x Clear CMOS Switch with LED – Rapid OC Button: +/- buttons to adjust OC frequency – 1 x PCIe ON/OFF Switch – 1 x Post Status Checker (PSC) |
| Rear Panel I/O | I/O Panel – 1 x PS/2 Mouse/Keyboard Port – 1 x HDMI Port – 1 x Optical SPDIF Out Port – 4 x Ready-to-Use USB 2.0 Ports – 6 x Ready-to-Use USB 3.0 Ports – 1 x RJ-45 LAN Ports with LED (ACT/LINK LED and SPEED LED) – 1 x Clear CMOS Switch with LED – HD Audio Jack: Rear Speaker / Central / Bass / Line in / Front Speaker / Microphone |
| Other Features / Miscellaneous | |
| OC Formula Kit | OC Formula Power Kit – Digi Power – Dual-Stack MOSFET (DSM) – Multiple Filter Cap (MFC) (Filter different noise by 3 different capacitors: DIP solid cap, POSCAP and MLCC) – Premium Alloy Choke (Reduce 70% core loss compare to iron powder choke) OC Formula Connector Kit – Hi-Density Power Connector – 15μGold Finger (CPU and memory sockets) OC Formula Cooling Kit – Twin-Power Cooling (Combine active air cooling and water cooling) – 8 Layer PCB, 4 x 2oz copper – GELID Solutions GC-Extreme Thermal Compound |
| Unique Feature | – Formula Drive – ASRock Instant Boot – ASRock Instant Flash – ASRock APP Charger – ASRock XFast USB – ASRock XFast LAN – ASRock XFast RAM – ASRock Crashless BIOS – ASRock OMG (Online Management Guard) – ASRock Internet Flash – ASRock UEFI System Browser – ASRock Dehumidifier Function – ASRock Interactive UEFI – NickShih’s OC Profile – Fine-Tuning V-Controller – Timing Configurator – Lucid Virtu Universal MVP – Hybrid Booster: – ASRock U-COP – Boot Failure Guard (B.F.G.) – Combo Cooler Option (C.C.O.) – Good Night LED *Lucid Virtu Universal MVP can be supported only with processors which are GPU integrated.**LucidLogix Virtu MVP only supports Windows® 7 OS or later versions. |
| Support CD | – Drivers, Utilities, AntiVirus Software (Trial Version), CyberLink MediaEspresso 6.5 Trial, ASRock MAGIX Multimedia Suite – OEM |
| Accessories | – 1 x ASRock SLI_Bridge_2S Card – Quick Installation Guide, Support CD, I/O Shield – 6 x SATA Data Cables – 2 x SATA 1 to 1 Power Cables – 1 x Front USB 3.0 Panel – 4 x HDD Screws – 6 x Chassis Screws – 1 x Rear USB 3.0 Bracket – 10 x OC Stands – GELID GC-Extreme Thermal Compound |
| Hardware Monitor | – CPU/Chassis/Power/MOS Temperature Sensing – CPU/Chassis/Power/MOS Fan Tachometer – CPU/Chassis/MOS Quiet Fan (Allows Chassis Fan Speed Auto-Adjust by CPU Temperature) – CPU/Chassis/MOS Fan Multi-Speed Control – Multi Thermal Sensor – Voltage Monitoring: +12V, +5V, +3.3V, CPU Vcore |
| Form Factor | – CEB Form Factor: 12.0-in x 10.5-in, 30.5 cm x 26.7 cm – Premium Gold Capacitor design (100% Japan-made high-quality Conductive Polymer Capacitors) |
Next we will take a look at the some of the features. I have cherry picked several of the major features below. The complete list can be found at the Asrock website as well.
 | 12 + 4 Power Phase Design: ASRock Z77 OC Formula is designed with a 12 + 4 Power Phase design. It features sturdy components and completely smooth power delivery to the CPU. Plus, it offers unmatched overclocking capability and enhanced performance with the lowest temperature for advanced gamers as well. |
 | Premium Alloy Choke (PAC): Compared to iron powder choke, the new Premium Alloy Choke technology on ASRock OC Formula Motherboard Series highlights a special alloy formula which is able to reduce up to 70% core loss. The revolutionary choke construction features a highly-magnetic and heat-resistant design, increasing the board’s lifespan as well. |
 | Dual-Stack MOSFET (DSM): DSM is an innovative new design of MOSFETs. The silicon die area is increased by stacking two dies into a MOSFET. The larger the die area, the lower Rds(on). Compared to traditional discrete MOSFET, DSM can provide larger die area and lower Rds(on), so the power supply for CPU Vcore is more efficient.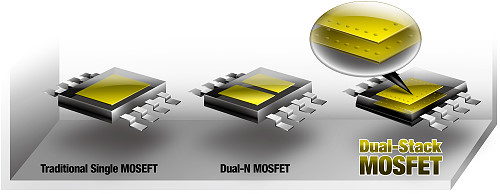 |
 | Digi Power: Z77 OC Formula is equipped with CHIL 8328 silicon which features a new digital PWM (Pulse-Width Modulation) design, providing CPU Vcore voltage more efficiently and smoothly. |
 | Multiple Filter Cap (MFC): The ASRock Z77 OC Formula features a new capacitor design called MFC (Multiple Filter Cap), which includes a combination of highly conductive MLCC, DIP caps and POSCAP. MFC helps the system filter noise from high-freq, mid-freq to low-freq noise, delivering enhanced and higher current to the CPU. With the combined power of three capacitors, MFC allows users to overclock their PC rig to extreme levels without worrying about the hardware components.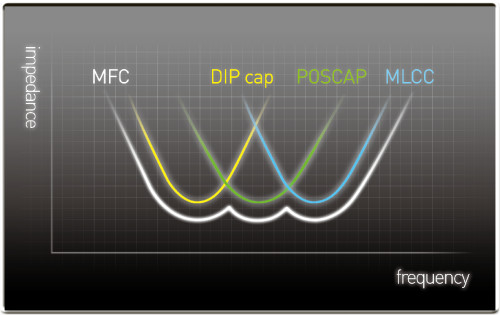 |
 | Twin-Power Cooling: Twin-Power Cooling combines active air cooling with water cooling. The ultimate heatpipe cooling design maximizes the system’s convection to expel hot air out, providing great air flow and faster heat dissipation. |
 | 8 Layer PCB, 4 x 2oz Copper: Brilliantly designed to boost performance with the lowest temperature, ASRock Z77 OC Formula is built on an 8-layer-PCB design. It comes with 4 sets of 2 ounces copper inner layers, using only carefully selected copper materials for PCB layers, delivering lower temperature and higher energy efficiency for overclocking. |
 | 15μ Gold Finger: ASRock has embedded 15μ Gold Finger for both CPU sockets and DRAM slots. Compared to other boards that come with only 3-4μ, ASRock Z77 OC Formula provides 15μgold components within the sockets, delivering triple performance than usual. With the unprecedented 15μ gold-inside design, overclocking the CPU and memory is easier than ever. |
 | NickShih’s OC Profile: Have you ever wondered how the global OC champion overclocks his motherboards? Now you’ve got a chance to learn a few tricks from the champion with NickShih’s OC Profile. It doesn’t matter whether you’re using a K-Series or No-K Series CPU, NickShih’s OC Profile will automatically detect your CPU and offer you different levels of overclocking. Have a taste of Nick’s secret recipe for overclocking this motherboard instantly. |
 | Multi Thermal Sensor: Multi Thermal Sensor is a new feature specially designed for ASRock Z77 OC Formula. It provides users the temperature of various parts of the motherboard graphically in ASRock UEFI Setup Utility, so that users may precisely keep track and control of the temperature of each parts of their motherboard when overclockin |
 | Timing Configurator: Timing Configurator is a fast and easy tool that provides users with an abundant collection of subtle DRAM settings for professional tweaking. You won’t even have to waste time on entering into the UEFI or restarting the system, Timing Configurator is an independent application that runs under Windows® OS and your changes will take effect immediately. |
 | Rapid OC – Quick & Fast Adjust OC Frequency: The onboard Rapid OC button allows novice overclockers to manually raise and lower the CPU ratio, BCLK frequency and CPU VCore voltage, while serious OC enthusiasts can use it to get the highest level of overclocking performance from their system and find their CPU’s best margin. |
 | Internet Flash: Internet Flash searches for available UEFI firmware updates from ASRock servers. System can auto-detect the latest UEFI from our servers and flash them within UEFI setup without entering Windows® OS. |
 |
As you can see, this board has a lot to offer a wide variety of users. Outside of the ‘power user’ items, ASRock has what they call XFast 555. These are three features on ASRock boards that are……you guessed it “5x” faster. First up is XFast RAM where you can create a virtual disk from the system memory to help boost performance for an application like Photoshop, reportedly by 5x. Next is XFast LAN, which states it can lower latency for games by setting the priority of the network traffic higher than other items in the network stack, again by 5x. Last is XFast USB which claims up to 5x USB performance in ATTO using 4K reads. I think all of these are good features to have on a motherboard of this caliber, if you use them.
Packaging & Accessories
Below we get a chance to see how ASRock decided to package this board. This box is a big one, that’s for sure. On the front side you will see what appears to be the Lamborghini Aventador gracing the cover with a transparent filter used to show the motherboard in’ the car. I was recently watching the Top Gear (American one… bleh!) episode that featured this car in it… how timely. That car screams performance, and ASRock wants you to feel the same way it seems. That said, there is nothing fancy on the front, outside of the car and the OC Formula symbol.
Flipping the box over you see a few of the features and achievements of this board. The features mentioned are the Nick Shih overclock profiles (going all the way up to 5.5 GHz for LN2), and the Twin Power cooling and more robust power delivery. The listed achievement is the “7 GHz” number that Nick hit, breaking the Ivy Bridge overclocking record with this board.
Opening up the ‘flip top’ on this box exposes you to even more ASRock marketing and features. The ASRock Trinity of Power Kit (12+4 phase / PAC’s, MFC’s, Dual stacked mosfets), Cooling kit (twin power cooling, 8 layer PCB with 2Oz of copper), and connecting kits (high density power connectors, and 15um gold on in the RAM and CPU slot) are all mentioned here.
|
|


|

 |  |  |
Opening up this treasure chest, you are greeted with a well protected board. There is a large foam piece protecting the middle of the motherboard, which is zip tied to the foam surround that protects it on the edges and bottom. The accessories are stored below the motherboard.
|
|


Speaking of accessories, this board comes with a typical compliment and perhaps a bit more. The accessories come in a velvet bag with the “OC Formula” symbol on it (see list below and above in the specifications table).
|

Accessory List
- 1 x ASRock SLI_Bridge_2S Card
- Quick Installation Guide, Support CD, I/O Shield
- 6 x SATA Data Cables
- 2 x SATA 1 to 1 Power Cables
- 1 x Front USB 3.0 Panel
- 4 x HDD Screws
- 6 x Chassis Screws
- 1 x Rear USB 3.0 Bracket
- 10 x OC Stands
- GELID GC-Extreme Thermal Compound
The ASRock Z77 OC Formula
Here we will finally get to see the board. Taking it out of the packaging you can see its larger than most boards (CEB form factor) and is sporting a black (real black, not brown!) PCB along with yellow accents on the DIMM slots, PCIe slots, and some of the SATA ports. Around the CPU area you can see the large, dual cooling solution (both air or water), and fan ASRock has used to keep its power bits cool. Solid gold colored caps a plenty, a total of six fan headers, dual bios, and ten SATA ports are pretty obvious to see, among other things. Nothing too much to see on the backside of the PCB, although you can see the large cooling solution has a bar placed over the rear to help cool any parts back there (MOSFETs).
|
|


|

A Closer Look
Now we will zoom in a bit on the parts here and explain with more detail what they are and the benefits of them. The first area we will look at is the CPU area and power delivery. ASRock states they have a 12+4 phase configuration on this board which are underneath the large cooler. This CPU area is a bit more populated than I would like to see for extreme cooling (insulation considerations), but I have seen worse. This is nothing a little conformal or Vaseline cant take care of easily, if that is your method. The issue here comes with using artist eraser around the socket area and the poking and prodding you have to do to get it down between the caps. That minor nitpick out of the way, in this shot you can clearly see the Premium Alloy Chokes (PAC’s), Dual Stack MOSFETs (DSM’s), and Multiple Filter Capacitors (MFC’s) surrounding the CPU.
|

Next up is the PCIe area of the board. You can see there are three 16x physical and two 1x physical slots. No legacy ports here people! Also pictured are the Realtek 8998 chip for audio processing, a Nuvotron chip for monitoring, and a PLX chip to give you more bandwidth in SLI/Crossfire configurations. It appears the board is electrically wired for 16x/8x/4x.
Moving up and over to the where the DIMMs slots are located, you can see it is typical with this platform. There are four slots allowing you to install up to 32GB of RAM running at speeds up to 3000 MHz (overclocked) if your CPU’s IMC is up to the task. We also see, from left to right in that picture, the front panel USB3 header, the 24-pin power, and the voltage read points covering Vcore, Vtt(1/2), VccSA, and VttIO to name a few. As far as voltage differences between the software and reading it off the read points, the difference was very low coming in at no more than .03 (always on the higher side) across any of the values.
Next up is the quick overclock buttons “+ and -” which aids in brink overclocking, or for just a quick and easy bump in performance without playing in the bios or windows based overclocking software. The last items I wanted to mention here are the debug LED and PCIe switches. You can quickly trouble shoot problems with the debug LED using the simple code it provides, or use the PCI switches to quickly disable/enable any of the three PCIe 16x physical slots if needed for graphics card troubleshooting.
|
|


Next we will look at the IO areas of the board. First up is the rear panel sporting a slew of USB2/3 connectivity (six USB 3.0, and four USB 2.0), a legacy PS/2 port, CMOS reset button, HDMI for use with the onboard GPU, 1 GB NIC, and analog and optical audio outputs.
Checking out the SATA side of the house for storage, we can see ten total ports here, which should be PLENTY for most users. The four black ports are SATA 3 (6 Gbps) controlled by the Marvell controller. There are two more SATA 3 ports (yellow, and to the left of the black ports, # 0/1) controlled by the Intel chipset for its SATA 3 throughput. The remainder of ports are SATA 2 (3 Gbps) based.
Last is the bottom I/O area. Per usual this area contains more USB 2.0 headers (one for use with the included front panel USB 2.0/3.0 connector), front panel audio, two fan headers, as well as connectivity for the front panel power/reset/HDD activity lights. A couple of things to note down here is the location of the power and reset buttons, as well as the two bios’. The last item of note in this area is the inclusion of a Molex connector to give more power to multi GPU setups.
|
|


|

Taking off her armor (heatsinks) and exposing the board’s juicy parts, you can see the setup they speak of in the power delivery area. The dual function heatsink made good contact with everything it was attached to, as well as the PCH heatsink touching what it needed to, so we were set there.
As far as function, the top heatsink really didn’t even get warm with benching at 5 GHz with 2700+ memory speeds. Even without using the water functionality of the cooler and just the minuscule fan to help, this heatsink does its job well. As far as noise goes, you can hear the small heatsink fan but its not loud at all and will easily be drowned out by your system fans or GPU.
The last two pictures show the motherboard without its two heatsinks installed. Not much to see, although removing the top heatsink does give way to the CHil power controller chip.
|

|
|


Below I took a few shots of the chips that make the board tick, in picture order:
- CHiL 8328 – Digitial PWM to aid is more, and cleaner power delivery to the CPU
- EtronTech EJ188 – USB3 controller
- Nuvotron NCT6776D – Super I/O chip used to monitor temperatures and voltages
- PLX PEX8605– Gives you more PCIe lanes for tri SLI/CrossfireX setups
- Marvell 88SE9172 – used for four additional SATA3 (6GBps) ports
- Realtek ALC898 – Audio, up to 7.1 channels
- Broadcom BCM57781 (not pictured) – NIC chip
|
|


|
|


UEFI BIOS and Overclocking Software
Next up we will take a look at ASRock’s UEFI BIOS. When you first get in to the BIOS, you will notice a couple of things. First, is the colorful nature of this BIOS. Its not like anything I have seen before with an active space/star themed backround… the stars actually twinkle. You also have the ability to enable/disable sounds in this BIOS. Sounds in the BIOS, what?!! Yeah, it’s true. Its a cool factor indeed. I have to admit I really liked the look of MSI’s UEFI BIOS, but the bells and whistles on this one have it beat. But bells and whistles do not a UEFI make. So enough fluff, lets see some details here and see how it well it works.
Across the top you will notice your typical options of Main (high level CPU info, what RAM is populated), OC Tweaker (overclocking functions – details below), Advanced (CPU options, Northbridge, Southbridge, Storage, USB configurations, Intel Rapid start, to name a few), Tools (UEFI browser, Online Management Guard (OMG), BIOS flashing), Hardware Monitor (temperature and voltage monitoring), and Boot (change the boot order/boot items). These options are quite typical and allow a good amount of control over your PC. The small thumbnails below these pictures are more BIOS screenshots of options within the menu items above.
|
|
|
|


|

 |  |  |  |  |
Overclocking in the UEFI BIOS
Below are the screens you will mostly be using in order to overclock on this board. At a high level there are PLENTY of options here to push your CPU and memory to limit. Digging down into this section, you will first notice a there is a OC profile named NickShih’s OC profile. The options in here go to up a blistering 5.5 GHz (for extreme overclocking) with clockspeeds starting out at 4 GHz. Another option not usually found on lower end motherboards, is a “LN2” switch to use with extreme overclocking.
All your typical overclocking options are there with your bclk/multiplier control, voltage control (CPU voltage, DRAM voltage, LLC, PLL override , VTTCPU 1/2, VCCSA), among others. I’m really not certain why there are two VTT CPU voltages, but when using auto, only one changes. I speculate this may be for each channel of ram (pure guess there)? Also pictured in this section of the BIOS is your ram frequency and strap settings, as well as the XMP profile you can select (more details below).
|
|


|

The last set of BIOS screenshots are to show you the memory timings section. There isn’t terribly much to see here. You have Primary, Secondary, and Tertiary timings that are all adjustable. There are other options that, to be frank, I haven’t seen before. Seems like it’s all here and then some.
|
|


|

Overall, maneuvering around this BIOS was quite easy with the keyboard or the mouse. There were no freezes, delays or quirks that I found during my use. This BIOS now takes the top spot, with both looks and function, over the MSI UEFI implementation.
ASRock Formula Drive (Windows) / Timings Configurator
ASRock, like all other major motherboard makers, has their own Windows based software for monitoring and overclocking. ASRock calls theirs, Formula Drive. You can see things like temperatures and voltages in the Hardware Monitor (1st picture), to controlling your fans attached via the six motherboard headers with a familiar graph situation (temperature x = fan speed); this section is called Fan-tastic Tuning (2nd picture). Of course we have overclocking functions in the Overclocking section (BCLK, CPU ratio, vcore/dram voltage/VTT/SA), and last but certainly not least is the Thermal Sensor. One thing that is pretty cool with the thermal sensor is you can see a schematic of the board and see the location of the sensors and their temperature. I can’t think of a competitors board outside of the ASUS Sabertooth line that has such a display (in the thumbnails below it is the last picture). It’s a nice feature to see, especially when extreme overclocking. I was always curious to see what temperature the board was at for some reason.
Outside of those main screen, there are OC DNA which shows BIOS revision and date, and is where you can create and save overclocking profiles. IES shows how many power phases are in use as well as clockspeed and voltage. The XFast RAM section is where you setup your ram drive and its parameters, and last is the options screen for the Formula Drive software.
Overall, a fairly comprehensive utility, especially when used with the Timings Configurator for the memory (details below). It had all the functions I needed to push on clockspeeds and control fans.
|
|
|
|


 |  |  |  |  |
Timings Configurator
ASRock has their own application to change memory timings from within Windows, called Timings Configurator. This allows one to change primary, secondary, and tertiary timings from within your Windows based operating system. I had no problems working with this application and changing memory timing,s so all good on that front. This is a welcomed addition to a high end, ‘made for overclocking’ motherboard.
 |
Test Setup, Benchmarks, and Overclocking
Listed below is the test system used for benchmarking:
| Test Setup | |
| CPU | Intel i7 3770K @ 3.5 GHz |
| Motherboard | ASRock Z77 OC Formula |
| RAM | 2×4 GB Kingston HyperX Predator DDR3-2666 11-13-13-32 |
| Graphics Card | Galaxy GTX660 GC 2GB |
| Solid State Drive | 60 GB Vertex 2 |
| Power Supply | SeaSonic SS-1000XP (80+ Platinum) |
| Operating System | Windows 7 x64 SP1 (Fresh Install) |
| Graphics Drivers | 302.23 |
| Equipment | |
| Digital Multimeter | |
The first set of tests we will look at are synthetic benchmarks using AIDA64 and Maxmemm for memory. Then we’ll move on to some rendering applications using Cinebench R10 and 11.5. After that, we will keep the benchmarking contingent happy with Super Pi 1M/32M and WPrime 32M/1024M.
There isn’t too much to see here outside of the memory speeds when they are set to an obnoxious ‘out of the box’ speed of 2666 MHz. There is a lot of bandwidth and lower latency to show for it. Overclocking just pushes all numbers up quite a bit in this bench. It’s too bad these changes do not translate to real world results, but hey… we do see improvements!
Moving on to the rendering application Cinebench R10 and R11.5, we see typical results compared with other Z77 motherboards even with the huge memory bump compared to past reviews… like Obi Wan Kenobi said, ‘these are not the results you are looking for…’ but as you can see it did post solid numbers at stock and overclocked, which was expected.
|
|
|
|
|
|
|
|


Next we get to look at Super Pi 1M/32M and WPrime 32M/1024M. The results in Super Pi 1M/32M are in line with the settings these were run with, specifically with the memory ramped up to 2666 MHz. About the only thing that came out slower was WPrime. For some reason this benchmark just didn’t like my setup in some way, and was and was a tenth of a second off of 32M and a couple seconds slower in 1024M. I can’t, with any confidence, blame the board as I have not tested with the ram that high on any another board to compare.
|
|
|
|
|
|


The last shots here are pushing the limits with a bump in clock speed to 5.150 GHz and memory at around 2700 MHz for Super Pi 1M. Supre Pi 32M was at 5 GHz clockspeed and 2654 MHz for the memory. I was able to break a personal best on the 1M run with a clock of 5.150 GHz on ambient (water) cooling, so that is a solid result there. This board and chip… I can hear it calling me… ‘please Earthdog, get me cold…. get me cold!!”
|
|


Conclusion
Boy oh boy, look what was brought to the table today. As I mentioned in the first paragraph of this review, ASRock has teamed up with Nick Shih to bring a board bred for overclocking to the store shelves, and it appears they have achieved it. Robust power delivery (12+4 phase, advanced Digi PWM, Dual stacked mosfets, and multiple filter caps), with dual cooling options for that solution (air or built in water cooling), debug LED, and voltage read points make this thing ready to go out of the box for overclocking. Other features like 10 SATA ports, a total of 8 USB 3.0 and 6 USB 2.0 ports are available for your storage and peripheral needs. Software features like the XFast RAM, LAN, and USB round things out at a high level, taking care of a lot of the enthusiast market.
With pricing coming in at $239.99 at newegg.com, the cost for the ASRock Z77 OC Formula is right in the upper midrange of Z77 based mainboards. This board, via price, competes with the likes of the ASUS Sabertooth ($239), ASUS P8Z77-V Pro ($239), MSI Z77 GD80 ($235), and a Gigabyte Z77X-UP5 ($239). Even though it’s targeted to enthusiasts and overclockers, the OC Formula is a very well-rounded solution which will not hold back anyone in regards to overclocking (even extreme overclocking), gaming, or those who need more than the typical amount of SATA ports. At its current price, the ASRock Z77 OC Formula should be one of the top choices available on the market today.
| |
Click the stamp to find out what this means
Joe Shields (Earthdog)


45 replies
Loading new replies...
Member
Member
Member
Gulper Nozzle Co-Owner
Senior Member
Benching Team Leader
Gulper Nozzle Co-Owner
Member
Gulper Nozzle Co-Owner
Water Cooled Moderator
Join the full discussion at the Overclockers Forums →